Automatically optimize traffic distribution across your campaign paths, landing pages, and offers using machine learning.
AI Smart Traffic analyzes your campaign performance data and adjusts traffic weights to send more visitors to your highest-performing elements. You can run it in Test Mode (suggestions only) or let it shift traffic automatically.
This feature replaces the previous AI Weight Suggestions (Beta). The core intelligence is the same, but you now have more control over how optimization runs, what metrics it targets, and whether changes are applied automatically or reviewed first.
What it does
When you enable AI Smart Traffic on a campaign, ClickFlare continuously evaluates how each element (offer, lander, or path) is performing based on your chosen metric. It then either suggests or applies new traffic weights to shift volume toward the best performers.
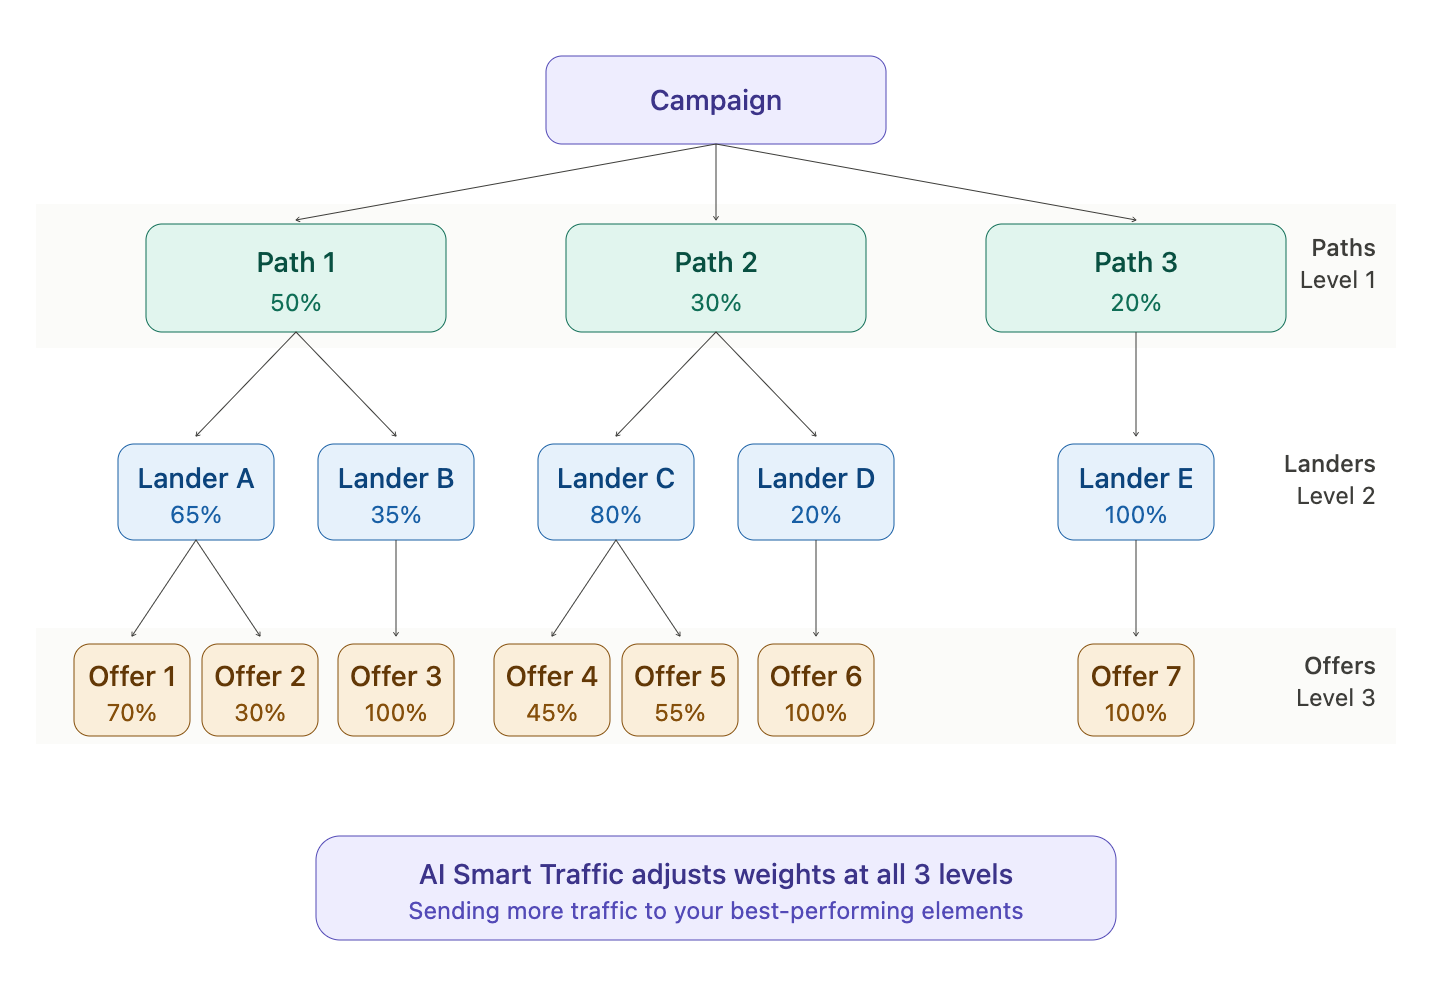
AI Smart Traffic works across three levels of your campaign:
-
Offers — Adjusts offer weights within a path to favor higher-performing offers.
-
Landing pages — Adjusts lander weights within a path to favor higher-performing landers.
-
Paths — Adjusts traffic distribution across all paths (including both default and conditional paths).
Requirements
Before enabling AI Smart Traffic, make sure:
-
Your campaign has revenue tracking configured. AI Smart Traffic needs conversion and revenue data to calculate performance. If you rely on EPV or ROI as your optimization metric, revenue must be flowing into ClickFlare.
-
Your campaign has enough traffic. The algorithm accounts for statistical significance, but it works better with a meaningful volume of clicks and conversions.
-
You have at least two elements to compare (two offers, two landers, or two paths). Optimization with a single element has nothing to optimize against.
How to set it up
Step 1: Open the campaign destination settings
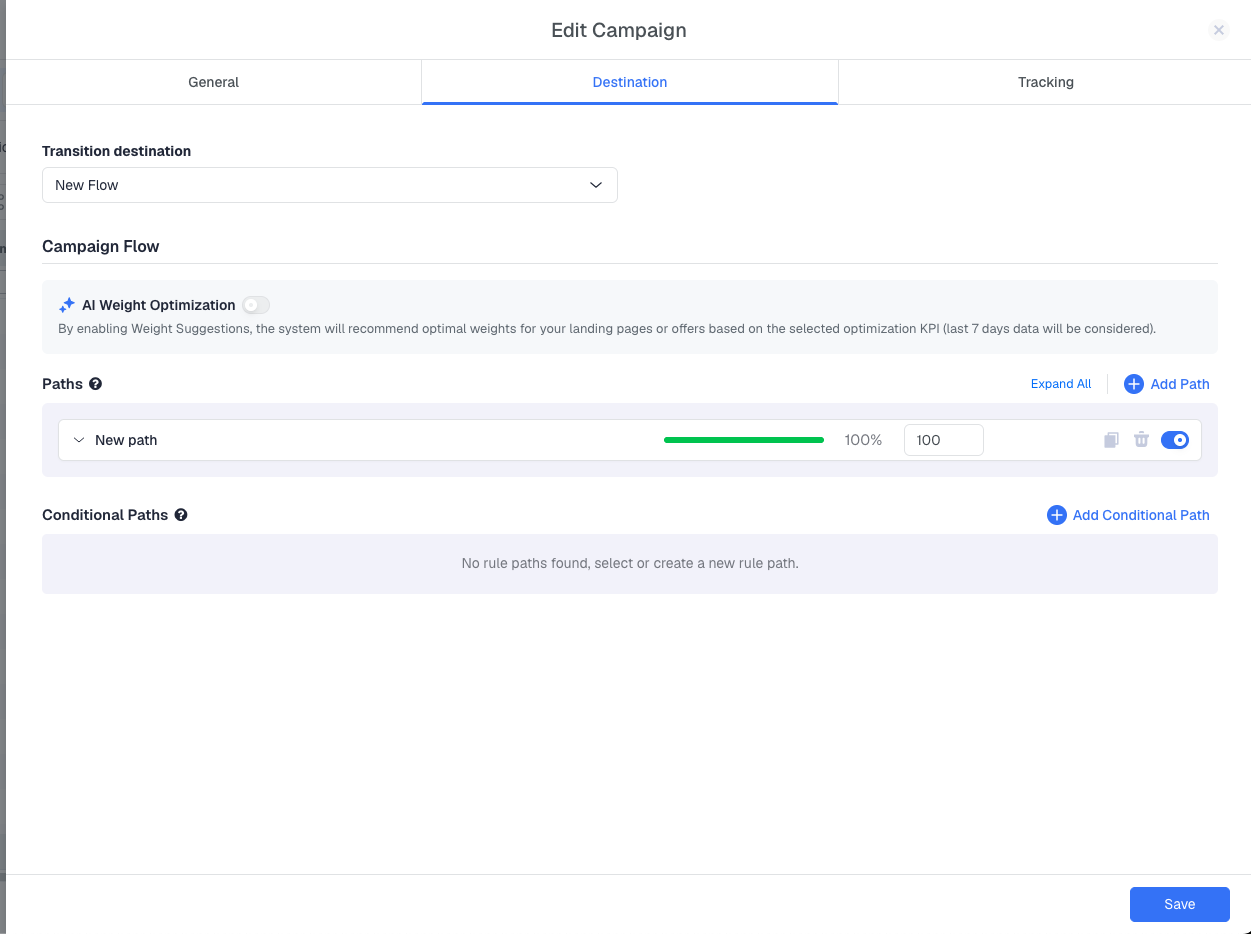
Inside your ClickFlare account, go to Campaigns, select the campaign you want to optimize, and click Edit. Navigate to the Destination tab.
Step 2: Enable AI Smart Traffic
Under the Campaign Flow section, toggle on AI Smart Traffic. Click the Configure button to open the configuration panel.

Step 3: Configure the optimization settings
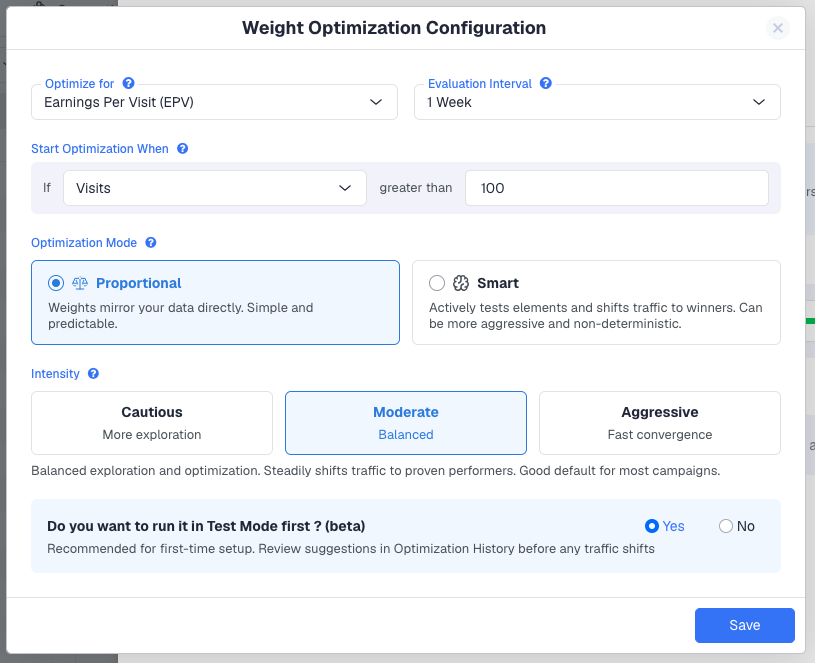
The configuration panel has four settings, plus an optimization mode selector.
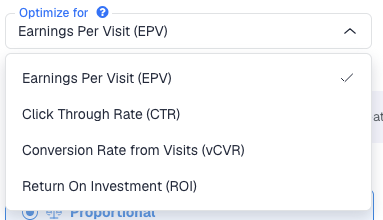
Optimize For — The metric used to determine which elements get more traffic:
-
Earnings Per Visit (EPV) — Total revenue divided by visits. Best general-purpose metric. Requires revenue tracking.
-
Click Through Rate (CTR) — Percentage of visitors who click through. Useful when optimizing for engagement rather than direct revenue.
-
Conversion Rate from Visits (vCVR) — Percentage of visits that result in a conversion. Good when conversion volume matters more than revenue per conversion.
-
Return On Investment (ROI) — Profit relative to cost. Best when you track both cost and revenue and want to optimize for profitability.
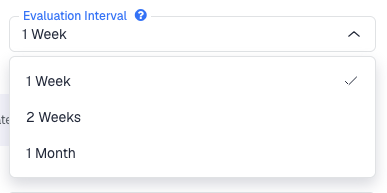
Evaluation Interval — How often ClickFlare recalculates and proposes (or applies) new weights:
-
1 Week — Recalculates every 7 days. Good for campaigns with consistent daily traffic.
-
2 Weeks — Recalculates every 14 days. Better for lower-volume campaigns that need more data per cycle.
-
1 Month — Recalculates every 30 days. Use this for campaigns where performance trends shift slowly.
Start Optimization When — Set a minimum threshold before optimization kicks in. For example, "If Clicks greater than 100" means AI Smart Traffic waits until the campaign has received at least 100 clicks before making its first suggestion or adjustment. This prevents premature optimization based on too little data. The available conditions are Clicks, Conversions, or Visits.

Step 4: Choose your optimization mode
Optimization Mode — Choose how weights are calculated:
-
Proportional — Weights mirror your data directly. If an offer earns 70% of your revenue, it gets 70% of your traffic. Simple, transparent, and predictable. No additional tuning needed.
-
Smart — Uses machine learning to actively test and learn which elements perform best, then shifts traffic toward winners while still exploring new options. This mode uses Thompson Sampling, a proven algorithm that balances exploration (giving new or underperforming elements a fair chance) with exploitation (sending more traffic to known winners).
When you select Smart, an additional Intensity setting appears:
-
Cautious — Explores broadly before shifting traffic. Gives new and underperforming elements more time to collect data before being deprioritized. Best when you frequently add new offers or landers.
-
Moderate — Balanced exploration and optimization. Steadily shifts traffic to proven performers while still giving new additions a fair chance. Good default for most campaigns.
-
Aggressive — Quickly shifts most traffic to the best-performing elements with limited exploration. Only recommended for high-volume campaigns with well-established elements where you are confident in your data.
Start with Smart at Moderate intensity. This works well for the vast majority of campaigns. You can always adjust later once you see how it performs.
Step 5: Choose Test Mode or Auto Mode
At the bottom of the configuration panel, you will see: "Run in Test Mode first?"
-
Yes (default, recommended) — ClickFlare will calculate and suggest new weights, but will not automatically shift your traffic. You can review each suggestion in the Optimization History panel and decide whether to apply it manually. This is the safest way to start: you see exactly what would change before anything touches your live traffic.
-
No — Weight changes will be applied automatically at each evaluation interval. Traffic shifts happen without manual approval. Only select this if you have already validated the behavior in Test Mode or are comfortable with fully automated changes.
Review the suggestions over one or two evaluation cycles before switching to auto mode. This lets you catch any unexpected behavior (such as an element being weighted down due to a temporary tracking issue) before it affects your live campaigns.

Step 6: Save
Click Save to activate AI Smart Traffic. ClickFlare will begin collecting data and produce its first suggestion or adjustment after the evaluation interval passes and the "Start Optimization When" threshold is met.
Monitoring optimization activity
Campaign list indicator
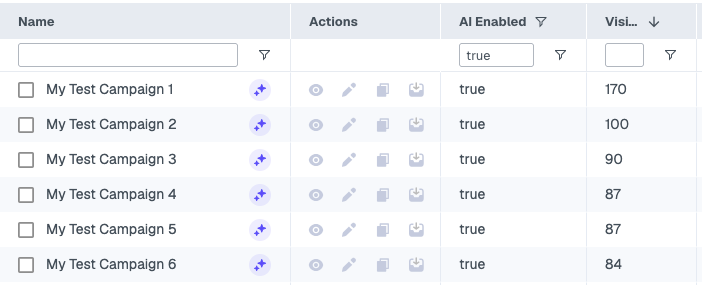
Campaigns with active AI Smart Traffic display a small AI icon next to the campaign name in your campaigns list. This gives you an at-a-glance view of which campaigns are being optimized. You can also add the AI Enabled column to your campaign view, which shows "true" for any campaign with AI Smart Traffic active.
Clicking the AI icon next to a campaign name opens the Optimization History panel directly.
Optimization History
To view optimization activity, click the AI icon next to a campaign name. This opens the Optimization History panel.
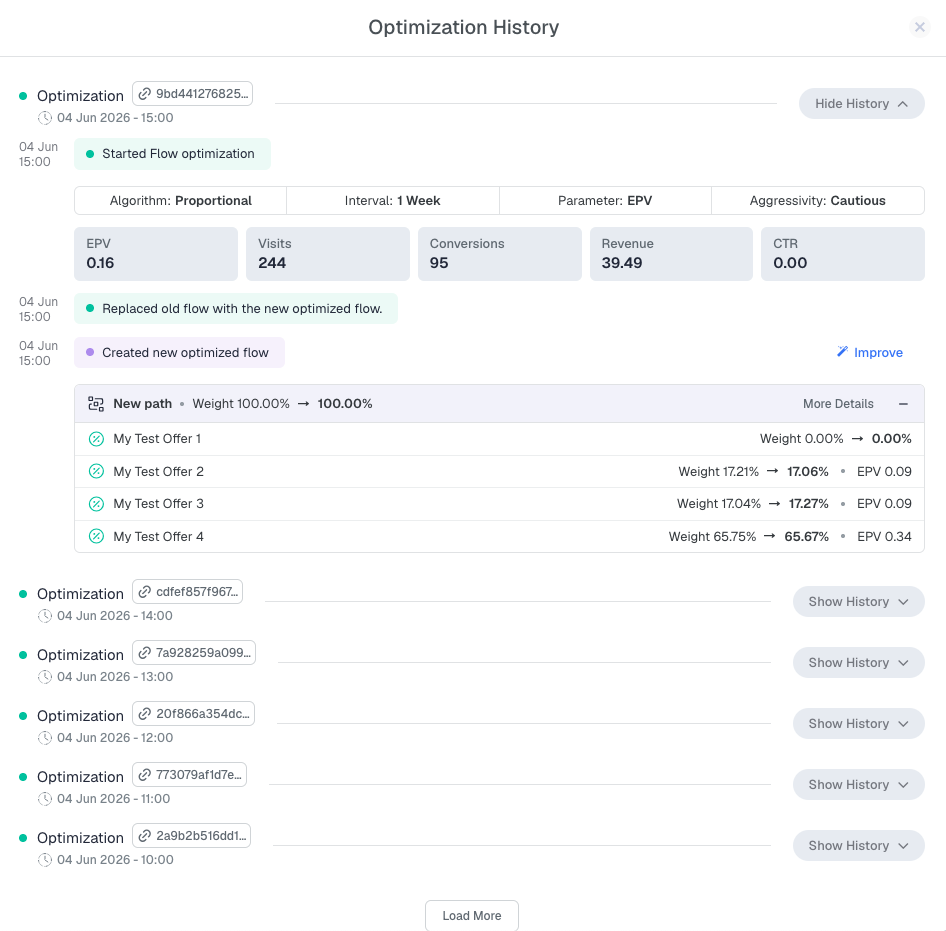
The history panel shows:
-
Configuration summary — The optimization mode, intensity, evaluation interval, and metric currently in use.
-
Performance snapshot — Current EPV, Visits, Conversions, Revenue, and CTR at the time of each optimization event.
-
Timeline of events — A chronological log showing when optimization started, when new flows were created, and what weight changes were suggested or applied.
-
Weight change details — For each path, lander, or offer, the panel shows the previous weight, the new (suggested or applied) weight, and the metric value at the time of evaluation.
If you are running in Test Mode, you will see an "Apply Suggestion" button next to each optimization event. Click it to accept and apply the suggested weights to your live campaign
Best practices
- Start with equal weights. Before enabling AI Smart Traffic, set all your landers, offers, or paths to equal weight distribution. This gives the algorithm a clean baseline and prevents bias from existing weight configurations.
- Use Test Mode for the first cycle. Let AI Smart Traffic suggest weights for at least one full evaluation interval. Review the suggestions and verify they make sense given what you know about your campaign before switching to auto mode.
- Match the evaluation interval to your traffic volume. High-traffic campaigns can use a 1-week interval. Lower-volume campaigns should use 2 weeks or 1 month to ensure enough data accumulates for statistically meaningful suggestions.
- Do not use Aggressive intensity with short intervals on low traffic. If your campaign gets 50 clicks per day, running at Aggressive intensity with a 1-week interval may produce erratic weight swings based on insufficient data. Use Cautious or Moderate intensity, or extend the interval to 2 weeks or 1 month.
- Adding new elements resets their weight. When you add a new offer, lander, or path, AI Smart Traffic will begin directing some traffic to it. It will recalculate and suggest or apply a new weight once enough data is available. If you are using Smart mode, the algorithm will naturally explore the new element before deciding how much traffic it should receive.
- Revenue tracking is required for EPV and ROI. If you use EPV or ROI as your optimization metric, make sure revenue is being reported to ClickFlare via postback or API. Without revenue data, these metrics will show as zero and AI Smart Traffic cannot function.
FREQUENTLY ASKED QUESTIONS
Got questions? Find the answers below:
Q1: Can I use AI Smart Traffic without tracking revenue?
A1: Yes, but only if you use CTR or vCVR as your optimization metric. EPV and ROI require revenue data.
Q2: What is the difference between Proportional and Smart mode?
A2: Proportional simply mirrors your performance data in the weights. If offer A has 3x the EPV of offer B, it gets 3x the traffic. Smart mode uses a machine learning algorithm (Thompson Sampling) that actively balances testing new or underperforming elements against sending traffic to proven winners. Smart mode is recommended for most campaigns because it adapts better when offer performance changes over time.
Q3: What happens if I switch from Test Mode to Auto Mode?
A3: Weight changes will begin applying automatically at each evaluation interval. Any pending (unapplied) suggestions from Test Mode will not be retroactively applied. The next evaluation cycle will produce a new set of weights and apply them directly.
Q4: Can I turn off AI Smart Traffic after enabling it?
A4: Yes. Toggle it off in the campaign's Destination tab. Your current weights will remain as they are at the time you disable it, and no further changes will be made.
Q5: Does AI Smart Traffic work on conditional paths?
A5: Yes. It evaluates all paths, including conditional paths, and adjusts weights across them.
Q6: How is this different from the old AI Weight Suggestions?
A6: The previous version only suggested weights based on EPV, with no configuration options. AI Smart Traffic adds multiple optimization metrics (EPV, CTR, vCVR, ROI), configurable evaluation intervals, a choice between Proportional and Smart optimization modes, intensity control for Smart mode, and the ability to auto-apply changes instead of only suggesting them.