If you are just getting started with ClickFlare Tag Manager, we have created a complete overview of how the tag manager works and what you need to do to get started.
Checklist:
✅ Create your first Tag Manager container
✅ Install/Implement the ClickFlare Container Script in Your Website
✅ Test Your Tags and Triggers
✅ Edit Your Container
Creating Your First Tag Manager Container
To create your initial ClickFlare container, follow these simple steps:
- Navigate to Tag Manager in the left-side menu.
- Click on + New Container.
- Name your container and select a workspace.
- Define your variables, triggers, and tags.
- Once set up, remember to publish your container by clicking Publish Container.

Installing the ClickFlare Container Script in Your Website
After defining triggers and tags within your container, proceed with installing the container script on your website:
- Navigate to Tag Manager in the left-side menu.
- Select the desired container.
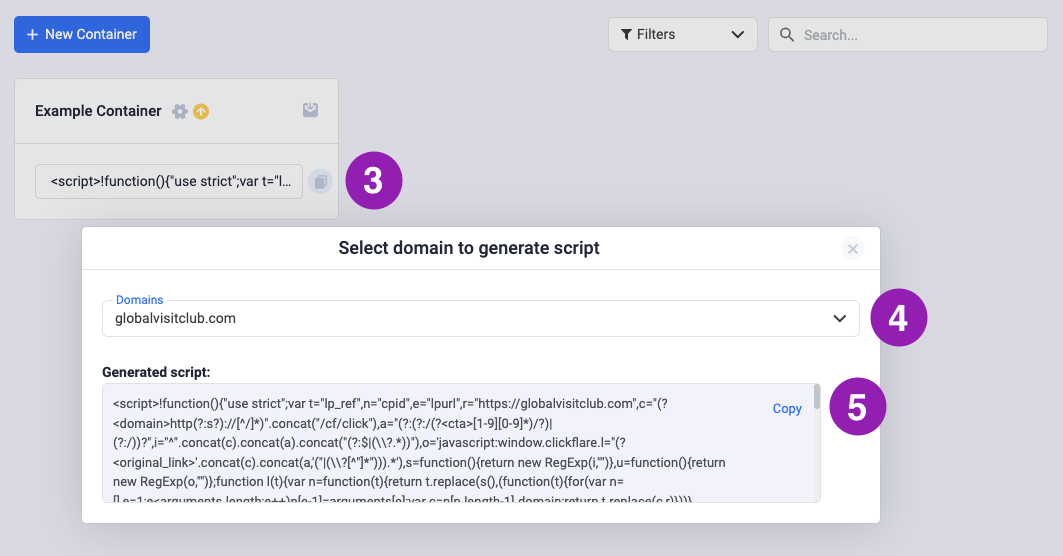
- Click the copy icon at the bottom right of the container.
- Choose the domain for the script's use.
- Copy the script provided.
- Paste the script inside the
<body>section of your website.
Test your tags and triggers.
After setting up your container and installing the script on your website, thorough testing is essential to ensure that your tags and triggers are functioning as intended. Follow these steps to conduct comprehensive testing:
-
Test Each Tag Individually: Begin by testing each tag separately to verify its functionality. Trigger the events associated with each tag to confirm that they fire correctly.
-
Test Trigger-Tag Relationships: Next, test the relationship between triggers and tags. Trigger the events specified by each trigger to ensure that the corresponding tags activate as expected.
-
Test Variable Usage: If you've defined variables within your container, test their functionality by confirming that they capture and transmit the correct data to associated tags.
-
Test Across Different Scenarios: Conduct tests under various scenarios to simulate real-world user interactions. Test different pages, devices, and user actions to ensure that your tags and triggers respond appropriately in each scenario.
-
Test in Different Environments: Test your container in different environments, such as staging and production, to verify consistent behavior across environments.
Editing a container
Once your ClickFlare Tag Manager container is set up and the script is installed on your website, managing your tags and triggers is effortless. The beauty of ClickFlare's tag manager lies in its simplicity – you implement the script only once, and you never need to touch the code again. Instead, everything is managed directly from CF's intuitive user interface (UI).
Here's how to edit your container:
-
Access Container Interface: Log in to ClickFlare Tag Manager and select your container.
-
Modify Tags and Triggers: Make changes to your tags and triggers directly within the interface.
-
Test Changes: Ensure your modifications work as expected by testing them thoroughly.
-
Review and Publish: Review your edits and publish the updated container to your website.
-
Collaborate: Collaborate with your team, assign roles, and request approvals as necessary.
By following these steps, you can efficiently manage and optimize your ClickFlare Tag Manager container without ever needing to touch your website's code again.
What is the Container ID?
The Container ID is a unique identifier in ClickFlare Tag Manager, linking your website's script to its corresponding container in ClickFlare. This ID ensures precise execution of tags and triggers without needing code changes. It's vital to verify the Container ID matches for seamless operation and efficient troubleshooting.
You can identify the container ID at the end of the container script.

Placing the campaign ID in the offer URL:
When using tags with a redirect tracking campaign, you should include the campaign ID in the offer URL like this:&cpid={campaign_id}