Depending on the traffic source you work with (e.g., Facebook, Google Ads, Newsbreak, Snapchat), you may need to send visitors directly to your campaign’s landing page instead of using a 302 redirect.
This is required by some ad networks (such as Google Ads) to improve page load speed and maintain compliance.
This guide explains how to set up direct tracking in ClickFlare so that clicks, conversions, and key campaign metrics are accurately recorded without a redirect.
Set up requirements:
-
A landing page ready to receive traffic.
-
Access to your landing page code (to add the ClickFlare direct tracking script).
-
An offer page (the destination users reach after clicking your CTA).
-
A tracking domain is properly set up in ClickFlare.
Direct tracking with Landers & Offer funnel:
Step 1 – Add Your Landing Page to ClickFlare
-
Log in to ClickFlare.
-
From the left menu, go to Landers → click [+ New].
-
Enter the details of your landing page (name, URL, etc.) and save.
Click here for a detailed guide on how to create landing pages.
Step 2 - Add the Direct Tracking Script to Your Landing Page
Direct tracking requires a special JavaScript snippet that allows ClickFlare to capture campaign IDs and user engagement without a redirect.
-
Insert the Script
Copy the full direct tracking script above (including <script> tags, then paste it in the <body> section of your landing page, right before the body closing tag.
<script>!function(){“use strict”;var n=“lp_ref”,t=“cpid”,e=“lpurl”,r=“https://yourtracking.domain”,c=“(?<domain>http(?:s?)://[^/]*)“.concat(“/cf/click”),a=“(?:(?:/(?<cta>[1-9][0-9]*)/?)|(?:/))?“,i=“^”.concat(c).concat(a).concat(“(?:$|(\\?.*))“),o=‘javascript:window.clickflare.l=“(?<original_link>‘.concat(c).concat(a,‘(“|(\\?[^“]*“))).*‘),s=function(){return new RegExp(i,“”)},l=function(){return new RegExp(o,“”)};function u(n){var t=function(n){return n.replace(s(),(function(n){for(var t=[],e=1;e<arguments.length;e++)t[e-1]=arguments[e];var c=t[t.length-1].domain;return n.replace(c,r)}))}(n);return’javascript:window.clickflare.l=“‘.concat(t,‘“; void 0;‘)}function f(n,t){if(t&&n&&t.apply(document,[n]),/loaded|interactive|complete/.test(document.readyState))for(var e=0,r=document.links.length;e<r;e++)if(s().test(document.links[e].href)){var c=document.links[e];window.clickflare.links_replaced.has(c)||(c.href=u(c.href),window.clickflare.links_replaced.add(c))}}!function(c,a){var i=document.onreadystatechange;window.clickflare||(window.clickflare={listeners:{},customParams:{},links_replaced:new Set,addEventListener:function(n,t){var e=this.listeners[n]||[];e.includes(t)||e.push(t),this.listeners[n]=e},dispatchEvent:function(n,t){(this.listeners[n]||[]).forEach((function(n){return n(t)}))},push:function(n,t){(this.listeners[n]||[]).forEach((function(n){return n(t)}))}},document.onreadystatechange=function(n){return f(n,i)},f(null,i),setTimeout((function(){!function(c,a){var i,o=function(c,a){var i=new URL(“”.concat(r).concat(c));a.startsWith(“{{“)||i.searchParams.set(t,a);return i.searchParams.append(n,document.referrer),i.searchParams.append(e,location.href),i.searchParams.append(“lpt”,document.title),i.searchParams.append(“t”,(new Date).getTime().toString()),i.toString()}(c,a),s=document.createElement(“script”),u=document.scripts[0];s.async=1,s.src=o,s.onerror=function(){!function(){for(var n=function(n,t){var e=document.links[n];l().test(e.href)&&setTimeout((function(){e&&e.setAttribute(“href”,function(n){var t=n.match(l());if(t){var e=(t.groups||{}).original_link;return e?e.slice(0,-1):n}return n}(e.href))}))},t=0,e=document.links.length;t<e;t++)n(t)}()},null===(i=u.parentNode)||void 0===i||i.insertBefore(s,u)}(c,a)})))}(“”.concat(“/cf/tags”,“/”).concat(new URL(window.location.href).searchParams.get(“cftmid”)||“{{__CONTAINER_ID__}}“),new URL(window.location.href).searchParams.get(t)||“{{__CAMPAIGN_ID__}}“)}();</script>Or you can place this external script version (make sure to replace the domain)
<script async defer src="https://domain.com/cf/scripts/direct"></script>-
Place your CTA links that CF provides
- Copy your CTA links provided by ClickFlare.
Then update the URL by replacing:
https://domain.com/cf/click/1
to your actual ClickFlare tracking domain.
(e.g., https://webeasyhit.com/cf/click).
- Update Call-to-Action Links
Your landing page’s CTA buttons/links must use ClickFlare’s click tracking URLs.
Example:
<!doctype html>
<html lang="en">
<head>
.
.
</head>

<body>
.
.
<a href="https://your-tracking-domain.com/cf/click/1">Your Call to Action</a>
.


<script>!function(){“use strict”;var n=“lp_ref”,t=“cpid”,e=“lpurl”,r=“https://yourtracking.domain”,c=“(?<domain>http(?:s?)://[^/]*)“.concat(“/cf/click”),a=“(?:(?:/(?<cta>[1-9][0-9]*)/?)|(?:/))?“,i=“^”.concat(c).concat(a).concat(“(?:$|(\\?.*))“),o=‘javascript:window.clickflare.l=“(?<original_link>‘.concat(c).concat(a,‘(“|(\\?[^“]*“))).*‘),s=function(){return new RegExp(i,“”)},l=function(){return new RegExp(o,“”)};function u(n){var t=function(n){return n.replace(s(),(function(n){for(var t=[],e=1;e<arguments.length;e++)t[e-1]=arguments[e];var c=t[t.length-1].domain;return n.replace(c,r)}))}(n);return’javascript:window.clickflare.l=“‘.concat(t,‘“; void 0;‘)}function f(n,t){if(t&&n&&t.apply(document,[n]),/loaded|interactive|complete/.test(document.readyState))for(var e=0,r=document.links.length;e<r;e++)if(s().test(document.links[e].href)){var c=document.links[e];window.clickflare.links_replaced.has(c)||(c.href=u(c.href),window.clickflare.links_replaced.add(c))}}!function(c,a){var i=document.onreadystatechange;window.clickflare||(window.clickflare={listeners:{},customParams:{},links_replaced:new Set,addEventListener:function(n,t){var e=this.listeners[n]||[];e.includes(t)||e.push(t),this.listeners[n]=e},dispatchEvent:function(n,t){(this.listeners[n]||[]).forEach((function(n){return n(t)}))},push:function(n,t){(this.listeners[n]||[]).forEach((function(n){return n(t)}))}},document.onreadystatechange=function(n){return f(n,i)},f(null,i),setTimeout((function(){!function(c,a){var i,o=function(c,a){var i=new URL(“”.concat(r).concat(c));a.startsWith(“{{“)||i.searchParams.set(t,a);return i.searchParams.append(n,document.referrer),i.searchParams.append(e,location.href),i.searchParams.append(“lpt”,document.title),i.searchParams.append(“t”,(new Date).getTime().toString()),i.toString()}(c,a),s=document.createElement(“script”),u=document.scripts[0];s.async=1,s.src=o,s.onerror=function(){!function(){for(var n=function(n,t){var e=document.links[n];l().test(e.href)&&setTimeout((function(){e&&e.setAttribute(“href”,function(n){var t=n.match(l());if(t){var e=(t.groups||{}).original_link;return e?e.slice(0,-1):n}return n}(e.href))}))},t=0,e=document.links.length;t<e;t++)n(t)}()},null===(i=u.parentNode)||void 0===i||i.insertBefore(s,u)}(c,a)})))}(“”.concat(“/cf/tags”,“/”).concat(new URL(window.location.href).searchParams.get(“cftmid”)||“{{__CONTAINER_ID__}}“),new URL(window.location.href).searchParams.get(t)||“{{__CAMPAIGN_ID__}}“)}();</script>
</body>
</html>If you skip this, ClickFlare cannot track click events.
Step 3 - Creating your Campaign
-
In ClickFlare, go to Campaigns → [+ New].
-
Choose your Traffic Source (Facebook, Google Ads, Newsbreak, Snapchat, etc.).
-
Select a Cost Tracking Model (auto or manual).
-
Name your campaign clearly (e.g., FB-USA-Women-Fitness).
-
Under Transition Type, set it to Direct.
 This setting will tell ClickFlare to use the direct tracking script present in your landing page, instead of waiting for users to be redirected through a redirect tracking campaign link.
Step 4 – Set Your Destination
In the campaign’s Destination Settings:
-
Choose the Landing Page where you added the direct tracking script.
-
Add the Offer URL where visitors will go after clicking the CTA.
Click here for more information about campaign destination settings.
Step 5 – Get Your Campaign Tracking URL
Once your campaign is saved:
-
Go to the campaign overview.
-
Copy the Lander Tracking URL (not the regular redirect link).
Example:
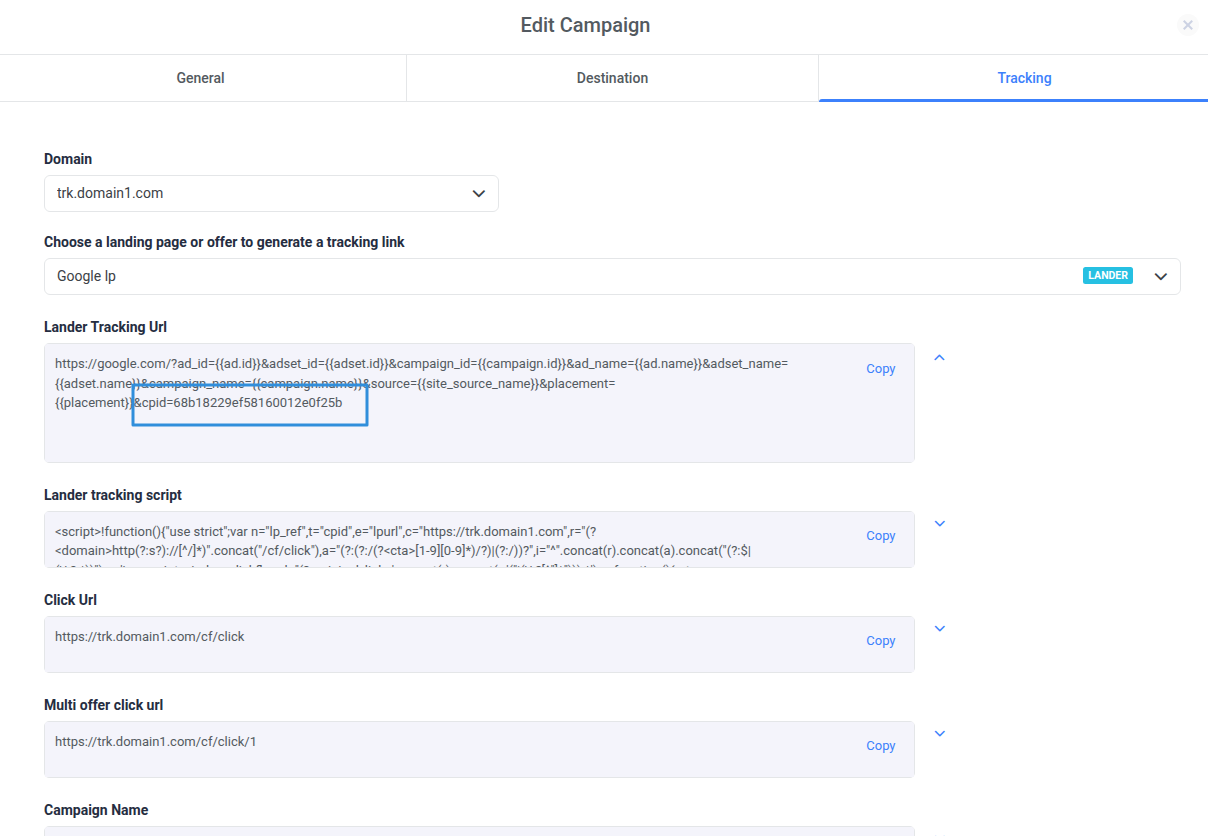
The key parameter is cpid, which uniquely identifies the campaign.
Direct tracking with offers only funnel:
To set up Direct Tracking when your funnel consists of offers only, follow these steps:
-
Configure the Campaign Transition
Inside the campaign, go to the General tab and set the Transition to Direct.
-
Set the Campaign Path
In the Destination section, create a path and select Offers Only as the path type.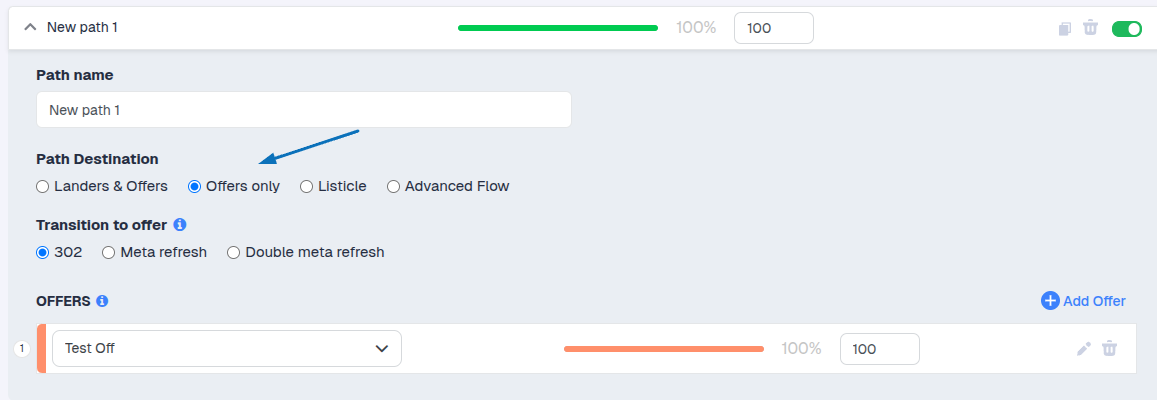
-
Enable Direct Tracking on the Offer
Open the offer settings and toggle Direct Tracking ON.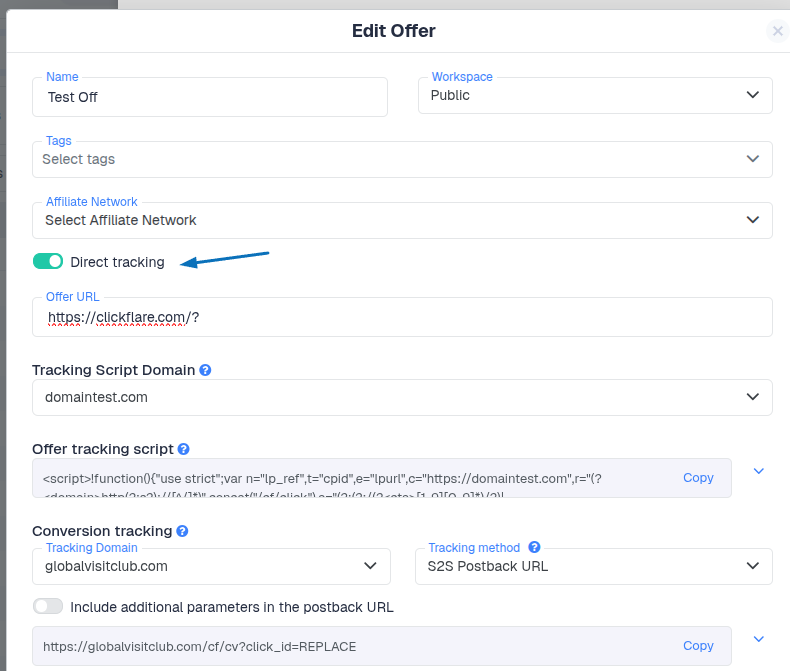 Important note:
When using Direct Tracking with an Offers-Only funnel, you do not need to map the ClickFlare click ID in the offer URL. Since there is no redirect step in this setup, ClickFlare parameters are not replaced at that stage of the funnel. -
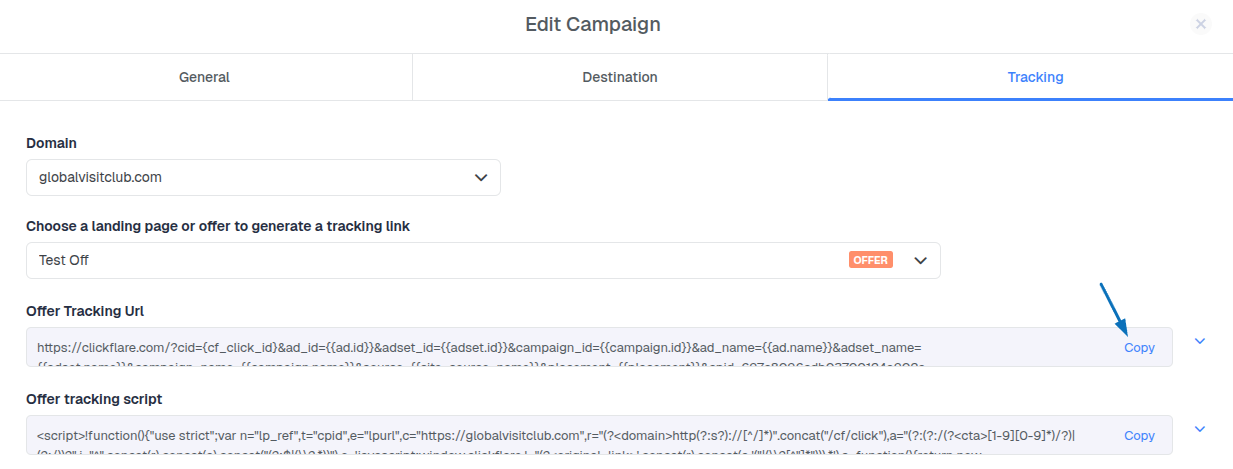
Placing the Offer Script on the Offer Page
To ensure proper tracking, place the offer script on your offer page:Tip: Insert the script inside the <body> tag of the page.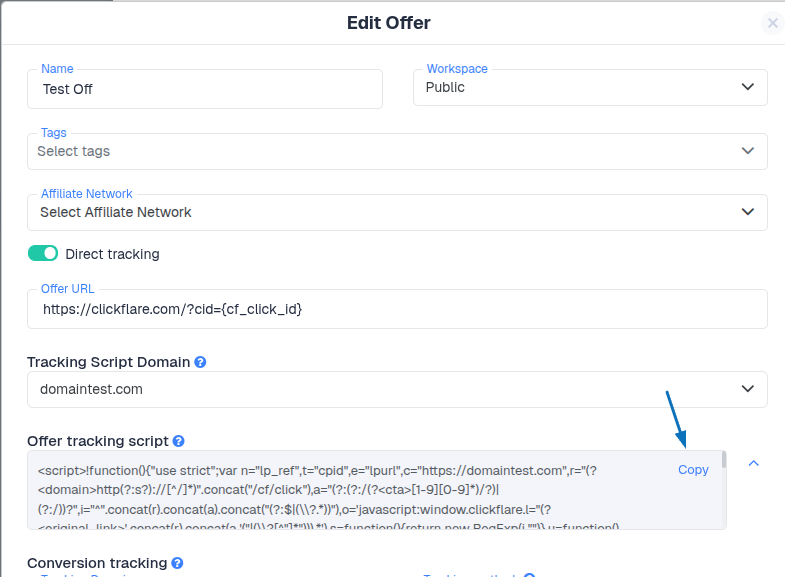
-
Using the Offer Tracking URL in Your Ads
Copy the Offer Tracking URL provided by ClickFlare.
Set it as the destination URL in your ad campaign so that all clicks are tracked correctly.
-
Passing the ClickFlare Click ID to Your Affiliate (Postback Tracking)
When using Direct Tracking with an Offers-Only funnel, ClickFlare does not replace parameters in the offer URL. If your affiliate requires the ClickFlare click ID to fire a postback and report conversions, you’ll need to retrieve it manually from the browser.
ClickFlare stores the click ID in a cookie, which you can access using JavaScript:window.clickflare.tracking_params.click_id
Common use cases
Passing the click ID to the affiliate:
Use a custom script to read the click ID from the cookie and append it to the affiliate request (for example, via a redirect, form submission).
Tracking conversions on a Thank You page:
If you have a Thank You page, you can use the conversion tracking script/pixel to trigger a conversion event so it gets logged on CF.
Without capturing and passing the ClickFlare click ID from the cookie, the affiliate will not be able to report conversions back to ClickFlare when using offers only with Direct Tracking.
🔧 Additional Tips & Best Practices
-
Facebook CAPI Integration: If you have Conversion API set up (like your Meta CAPI integration), you don’t need postback URLs for Facebook; data is sent server-side.
-
Google Ads: Direct tracking is required since Google blocks redirect tracking.
-
Testing: Always open the Lander Tracking URL in a browser to verify that ClickFlare parameters are loading correctly. You can check this by going to Inspect → Network and searching for tags in the network requests.