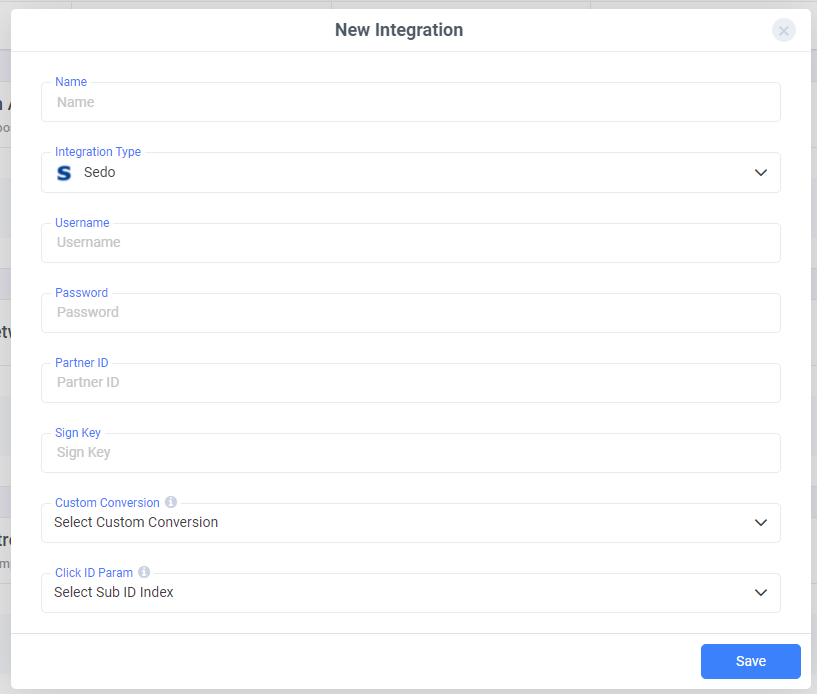
To add a Sedo integration to your ClickFlare account, begin by accessing the Integrations Menu, found in the Settings Menu (gear icon).
Setting Up Your Sedo Integration
- Under Revenue Stream Integrations, click Add Integration.
.png)
-
After naming your integration and selecting Sedo from the list of integration types, proceed to enter your Sedo account details, including:
-
Username
-
Password
-
Partner ID
-
Sign Key
Next, select the custom conversion you want to associate with this integration.
Need help creating a custom conversion in ClickFlare? Follow our guide here.
Then, specify the Click ID field that Sedo uses to pass back conversion data. Be sure to select the correct Sub ID (e.g., Sub ID 1, 2, or 3), depending on where the Click ID is being sent.
Once all fields are filled out, click Save to complete your Sedo integration.
-
Useful Example
Based on the integration video, below is an example of how your Sedo links should be configured in ClickFlare.
The domain is parked with Sedo, and you plan to send paid traffic to it. Before doing so, it’s important to ensure you’re passing the correct tracking parameters. This not only ensures compliance with Sedo’s policies but also meets the integration requirements for accurate tracking.
A properly built offer URL for Sedo should look like this:
https://sedo-parked.domain?sub1={cf_click_id}&sub2={trackingField11}&sub3={trackingField1}|{trackingField2}|{trackingField4}|{trackingField6}&network=outbrain&site={trackingField3}&adtitle={trackingField5}&kw1=best+life+insurance+quote&kw2=find+best+life+insurance+quote&kw3=best+life+insurance+quotes+in+your+area&kw4=life+insuranceAs you may notice, we are passing the following tracking information through the URL parameters.
| Parameter | Token | Description |
| sub1 | {cf_click_id} | ClickFlare's Unique click ID |
| sub2 | {trackingField11} | Traffic source tracking value |
| sub3 | {trackingField1}|{trackingField2}|{trackingField4}|{trackingField6} | Concatenated traffic source tracked values. |
| network | {traffic_source} | Name of the traffic source |
| site | {trackingField3} | Name of the site |
| adtitle | {trackingField5} | Title of the Ad |
According to SEDO's documentation, network name, site, and ad title are all required values.
On the sub-ids, we can pass all the data we want to keep track of the results of our campaigns. These data can be passed using ClickFlare tokens.
These tokens correspond to a specific value specified in the traffic source configuration.
Sedo Postback:
The Sedo postback is optional, but it enables real-time conversion tracking.
https://yourtrackingdomain.com/cf/cv?click_id={sub3}&payout={amount}&txid={uniqueId}¶m1={keyword}&ct=click
Note: Sedo AFD does not provide revenue data for the current day via the API.
When creating campaign links for Search Arbitrage campaigns, make sure to create separate links for each traffic source you are going to use to send traffic to. By doing so, you can make sure each traffic source is passing the right tracking information correctly.