In a visitor's journey, landing pages are a key element that directly impacts conversions; giving more space for engaging content or presenting various offers that different visitors can find appealing. Often, an additional landing page is needed, not as an alternative, but more as a second step, presenting to visitors more content and offers.
Before we proceed with this guide, here are a few things that you need: a pre-lander, a second lander, an offer to promote and a steady source of traffic.
Now there are three methods of setting up a multi-step landing page:
- Multi-offer lander method
- Secondary campaign method
- Internal redirection method
We shall explore each of the three in detail.
The Multi-offer Lander Method
This method involves using a multi-offer lander, when instead of offers you use landing pages. Say a visitor reaches a pre-lander with two offers, each of the offers when clicked, will have the same click URL (click URL 1), that will redirect the visitor to a second landing page. The second landing page will lead the visitor to the designated offer.
- Begin by creating a traffic source, you can follow our guide here.
- Then continue, by creating a lander, that will be a pre-lander with two CTAs.
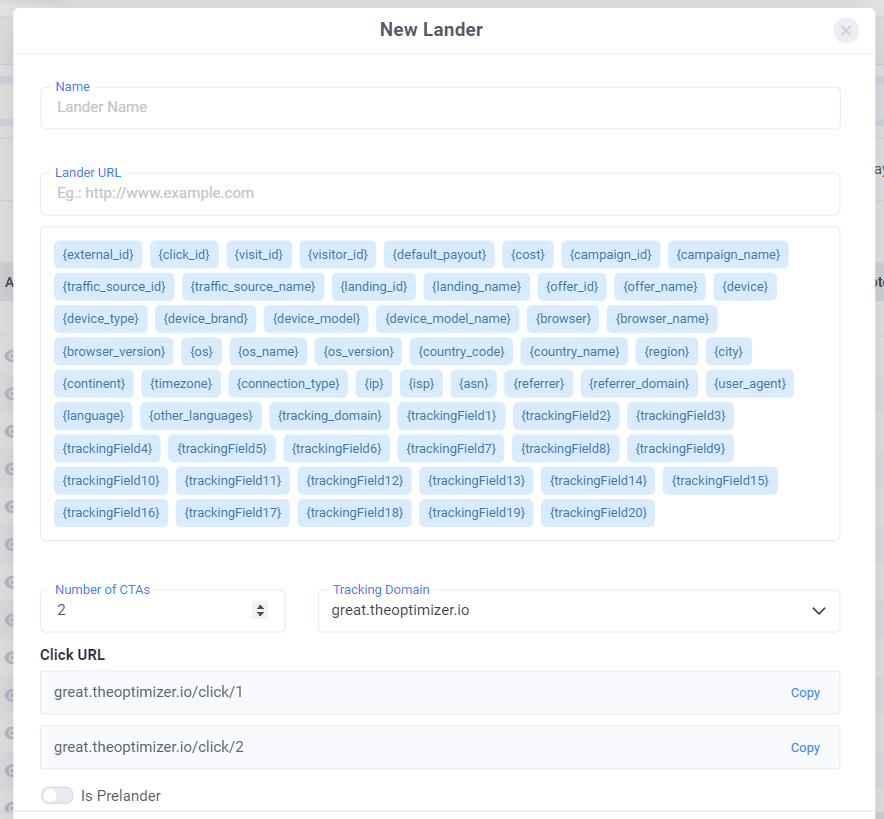.png)
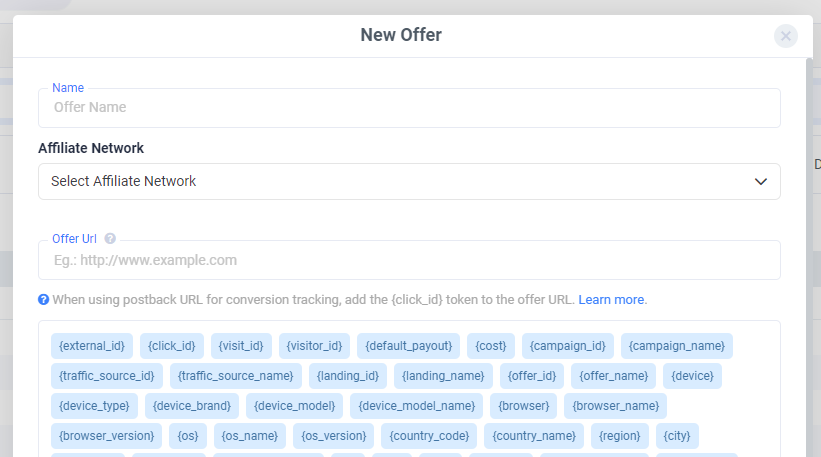
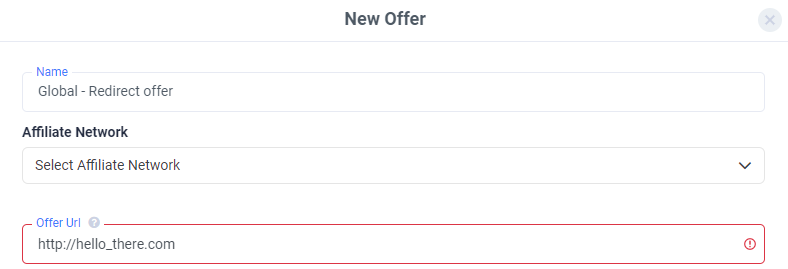
- Time to add an offer element that will serve as your second lander. Make sure to provide the URL of your second landing page as Offer URL.
.png)
- Create an offer element that will be your target offer. Provide the URL of your target offer as Offer URL.
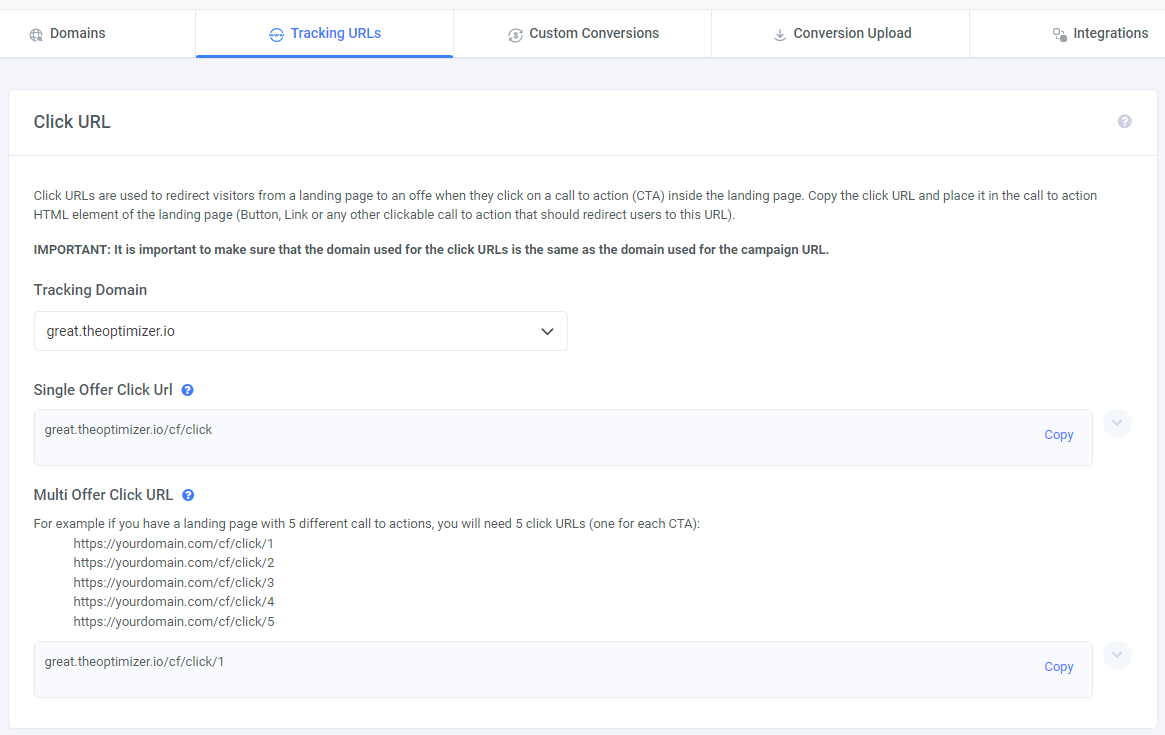
- Take the multi-offer click URL from ClickFlare and paste it somewhere you can access (e.g. a word file).
.png)
- Your multi-offer click URL 1 should look like this:
https://clickflare_dedicated_domain.com/click/1
Take it from your file and add this link into your pre-lander page's HTML code under the CTA element. - In your file, change the number at the end of the multi-offer click URL to 2. It should look like this:
https://clickflare_dedicated_domain.com/click/2
Copy it and implement the multi-offer click URL 2 into your second landing page's HTML code under the CTA element. - Lastly, create a campaign with the traffic source that you have created.
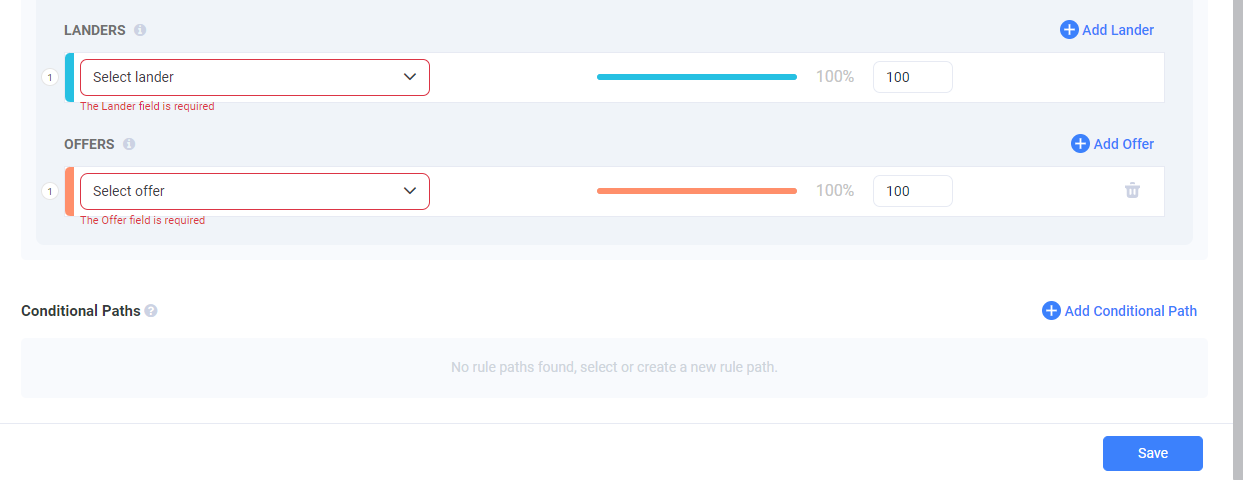
- Choose your pre-lander as a lander, the offer with the second lander URL as your first offer in order, and select target offer as your second offer in order in a default path.
.png)
- Once done, save the campaign & copy the campaign URL to submit it to the relevant traffic source.
The Secondary Campaign Method
The idea behind this method is that you create two campaigns. The first campaign redirecting you to the second campaign, with its offer URL being the second's URL. This sounds pretty straightforward, but there's another thing you need to do to make this method work. You need to modify the second campaign URL in a way that replaces all traffic source's tokens with ClickFlare custom variables.
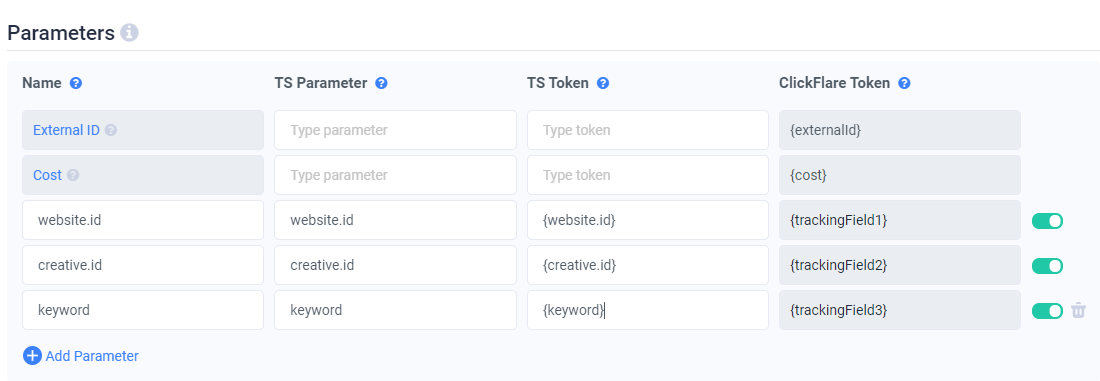
- Begin by creating a traffic source, you can follow our guide here.
- Map all the parameters to custom variables.
.png)
- Then move on to create an offer, that will serve as your target offer, the end offer you want to direct visitors to. Provide the link to this offer as the Offer URL.
- The next step would be to create a lander that will be your second lander in the funnel. Provide the URL of your second lander as the Lander URL.
- Create a second campaign, with second lander, target offer and the traffic source that you have just created.
.png)
- Copy the campaign URL and paste it on a file (e.g. a word file).
The campaign URL should look like:https://clickflare_dedicated_domain.com/84e2c1b9-7a79-450e-b8e9-9be588692266?website.id={website.id}&creative.id={creative.id}&keyword={keyword} - In the file, change traffic source token to ClickFlare custom variables.
{website.id}to{var1}{creative.id}to{var2}{keyword}to{var3}
Afterwards your campaign URL should look like:https://clickflare_dedicated_domain.com/84e2c1b9-7a79-450e-b8e9-9be588692266?website.id={var1}&creative.id={var2}&keyword={var3}
Making sure that all the info passed in the first campaign URL and matched with ClickFlare's custom variables will be passed along correctly - Go on to create a lander that will be your pre-lander. Provide the URL of your pre-lander as the Lander URL.
- Add a click URL to your pre-lander and second landing page.
- Create an offer that will be your redirect offer. Provide the edited campaign URL as an offer URL.
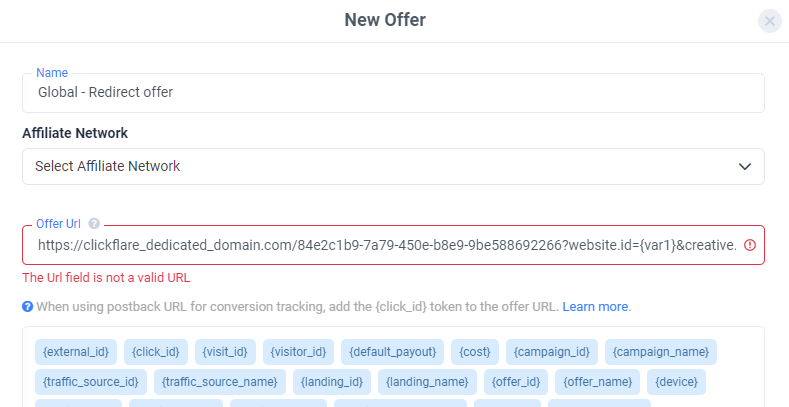.png)
-
Create the first campaign, with pre-lander element and redirect offer, and the same traffic source that you have created.
-
Once done, save the campaign and copy the first campaign URL to the clipboard and submit it to the relevant traffic source.
The Internal Redirection Method
Our third method uses a campaign with a rule-based path and a custom variable to create two redirection loops. The first one directs a visitor from a campaign URL to a pre-lander in a default path and then to a redirect offer, which contains the original campaign URL with a special custom variable added along. This custom variable is then recognized by a rule set in the rule-based path which directs the visitor to the second loop, with a second lander and a target offer.
- To apply this method, begin by creating a traffic source and mapping the
stepparameter to one of the custom variables.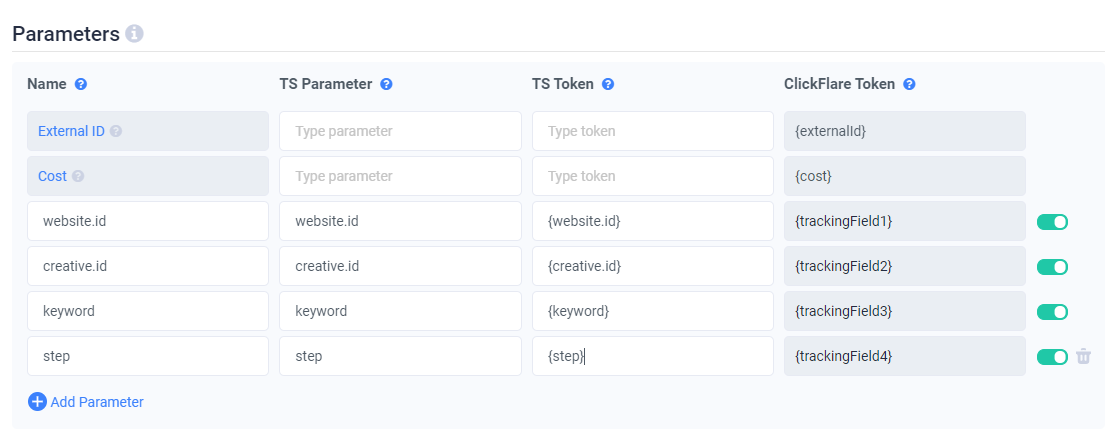.png)
- Continue by creating a lander element that will be your second lander in the funnel. Provide the URL of your second landed as the Lander URL.
- Then create a lander element that will be your pre-lander. Provide a URL of your pre-lander as the Lander URL.
- Move on to create an offer, that will be your target offer. Provide the link to your offer as the Offer URL.
- Create an offer element that will be your redirect offer. Because this offer will contain an edited campaign URL that you will create later, provide any placeholder URL that will allow you to save this offer. You will replace this URL with a campaign URL before finishing a campaign funnel.
.png)
- Create a campaign with an advanced form in which, you will select the traffic source that you have just created and also set a rule-based path that will be your second loop.
- Create a rule-based path on a custom variable. As a condition, select the custom variable that you have matched the
steptoken in the traffic source's setup. Provide "2" as your value. - Select second lander and target offer.
- Set a default path, that will be your first loop, by selecting the pre-lander and redirect offer.
- Once done, save the campaign.
- Copy the campaign URL from this campaign and paste it on a file (e.g. a word doc). You campaign URL should look like:
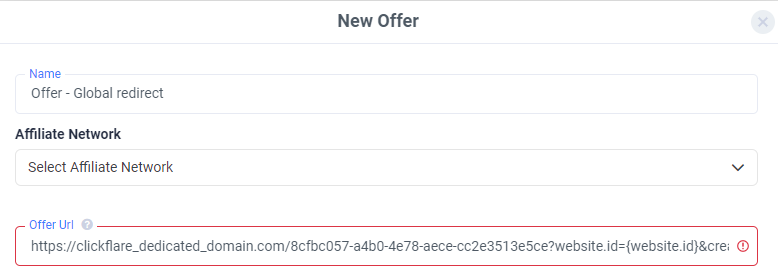
https://doc.clickflare.com/en/multi_step_landers.html#UUID-73564438-4336-4601-654c-8c12e136e400_bridgehead-5c7d182a743cb-idm46426580679440 - Replace the
{step}token at the end of this campaign URL with "2" value. Now your edited campaign URL should look like:https://clickflare_dedicated_domain.com/8cfbc057-a4b0-4e78-aece-cc2e3513e5ce?website.id={website.id}&creative.id={creative.id}&keyword={keyword}&step=2 - Edit the redirect offer and replace your placeholder URL with the edited campaign URL. Save the edited offer.
.png)
- Add a click URL to your pre-lander and second landing web pages.
- Copy the original (non-edited) campaign URL again and submit it to the relevant traffic source.
Traffic coming from a traffic source platform will go to ClickFlare campaign and due to this point not containing the "2" value in the step parameter matched with a custom variable, it will go to the default path. In this path, a pre-lander will be presented. Once a click URL on this page is activated, it will direct visitors to the same campaign, but this time, because the "2" value in the step parameter has been added to this campaign URL, traffic will go to the rule-based path. A second landing page will be displayed and then, subsequently, a target offer.