By using ClickFlare’s Conversion API for Pinterest Ads, you can report conversion events from ClickFlare back to Pinterest through Pinterest’s Conversions API (CAPI).
This works similarly to server-to-server postbacks, but is simpler to maintain and provides more reliable attribution.
Why should I use the Conversion API for Pinterest Ads?
Due to increasing browser restrictions and privacy frameworks (GDPR, ITP, ad blockers, etc.), traditional client-side tracking (Pinterest tag only) can miss a significant portion of conversions.
Pinterest’s Conversions API helps you overcome these limitations by sending events directly from ClickFlare’s servers to Pinterest, ensuring that the conversions tracked in ClickFlare are also reflected in Pinterest Ads reporting and optimization
With the Pinterest CAPI integration, you can:
-
Improve conversion accuracy and reduce data loss
-
Give Pinterest better data to optimize delivery and bidding
-
Maintain attribution even if cookies or browser tracking fail
What you'll need for the integration
-
An active Pinterest Business / Ads account
-
An active ClickFlare account
-
Your Pinterest Ad Account ID
-
Your Pinterest Conversion Access Token
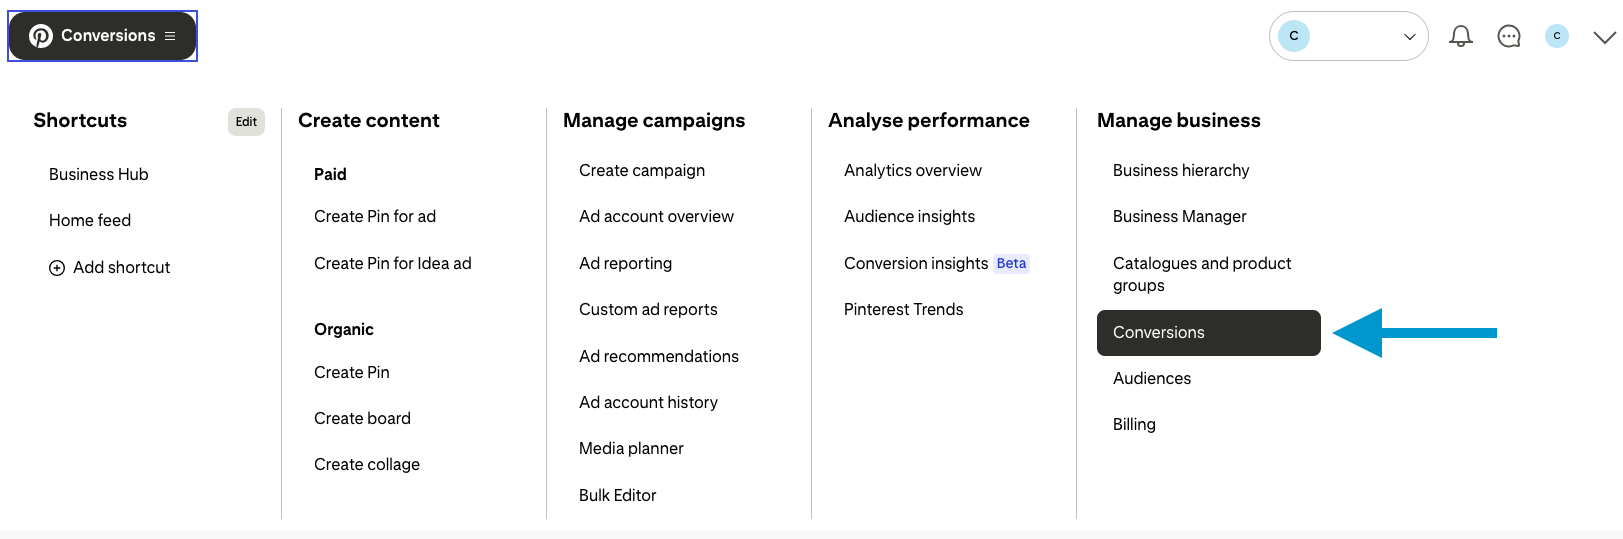
Pinterest Ad Account ID, and the Conversions access token are all available inside Pinterest Ads Manager under Conversions
Where to Find Pinterest Conversion API Information
Ad Account ID & Conversion Access Token
-
Log in to your Pinterest business account
-
Click the hamburger menu (☰) in the top-left corner
-
Under Manage business, click Conversions
-
In the left navigation, open Set Up API / Conversion Access Token
-
On this screen, you'll see:
-
Your Ad Account ID
-
A Generate new token button for the Conversions API
-
-
Click Generate new token, then copy and store it securely
-
You will use both the Ad Account ID and Conversion Token in your ClickFlare integration
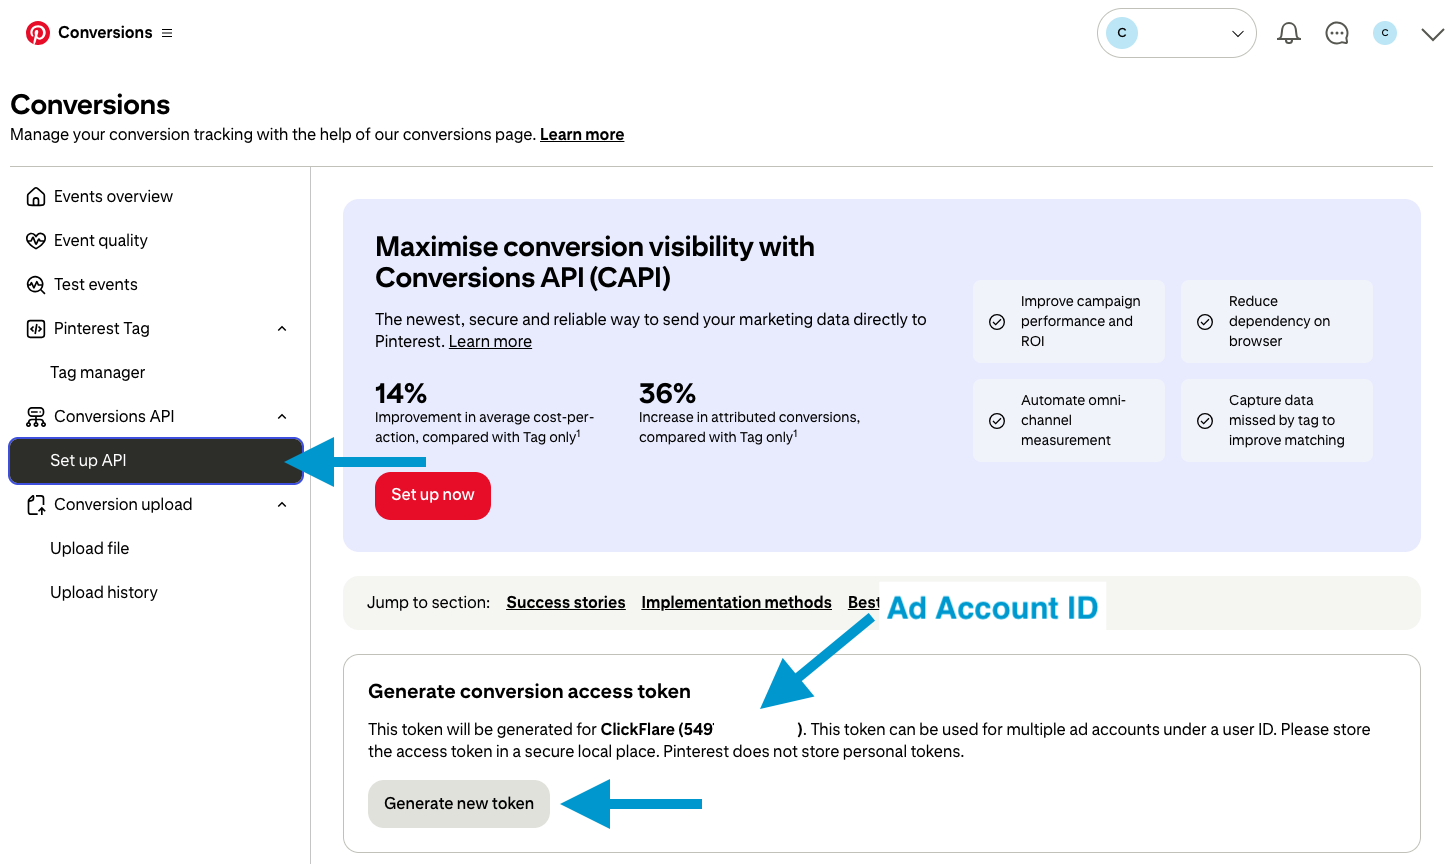
⚠️ Treat your Conversion Access Token like a password — do not share it publicly.
Integrating Pinterest Conversion API in ClickFlare
Follow the steps below to add your Pinterest CAPI integration in ClickFlare:
-
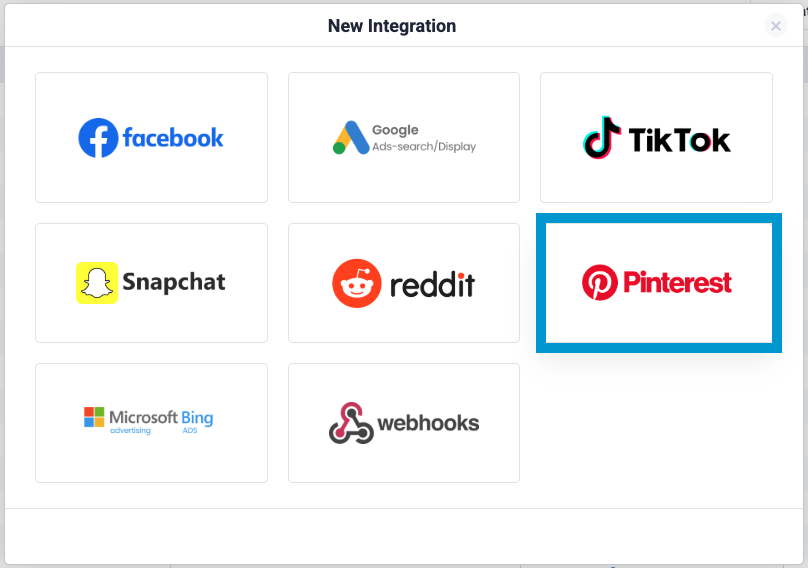
In ClickFlare, open the left-side menu and go to
Integrations → Conversion API Integrations -
Click Add Integration
-
From the list of available integrations, select Pinterest
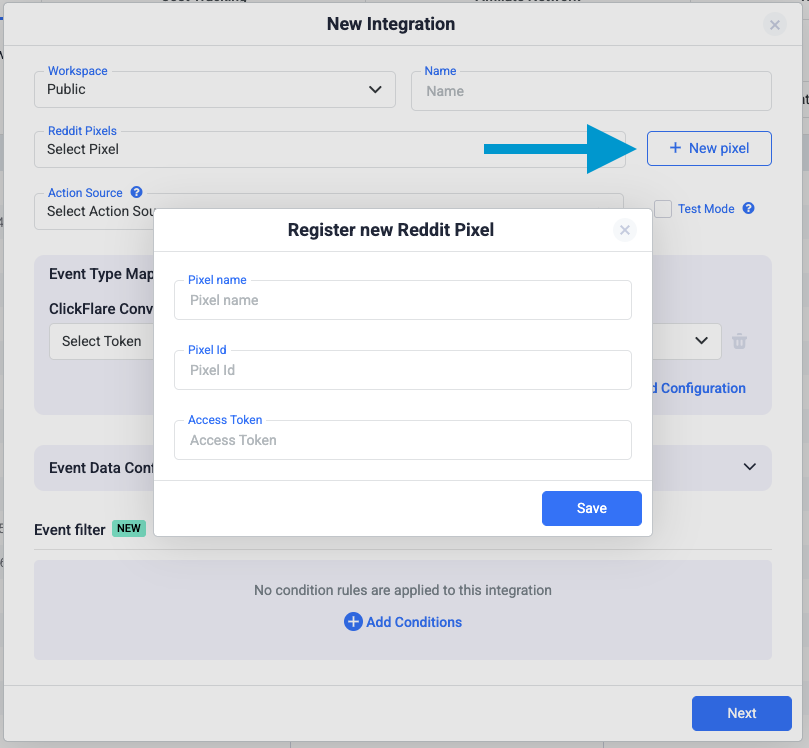
Step 1 — Add a new Pinterest CAPI configuration
In the Pinterest integration setup window:
-
In the Pinterest integration screen, click Add a new Pixel.
-
Fill in the following details:
-
Pixel Name: choose a recognizable name.
-
Ad Account ID: paste your Pinterest Ad Account ID
-
Access Token: paste the Conversions API token you generated under Set Up API
-
-
Click Save.
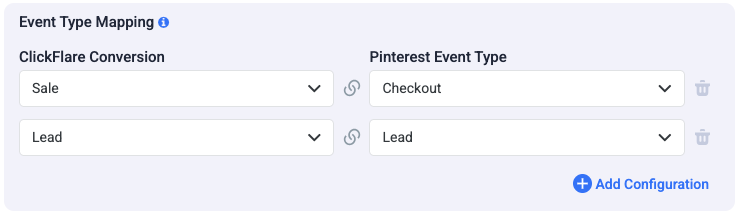
Step 2 — Map ClickFlare Events to Pinterest Events
Next, specify which ClickFlare conversion events should be sent to Pinterest and how they map to Pinterest’s standard event names.
Common Pinterest events include:
-
Checkout – completed purchase or transaction
-
Add To Cart – item added to cart
-
Page Visit / View Content – key landing/product page views
-
Lead – lead or signup intent
-
Signup – registration
-
Search – on-site search
-
View Category – category views
-
Watch Video – video engagement
-
Custom – any custom funnel action
Make sure that:
-
Only relevant ClickFlare events are mapped
👉 Learn how to create custom events in ClickFlare
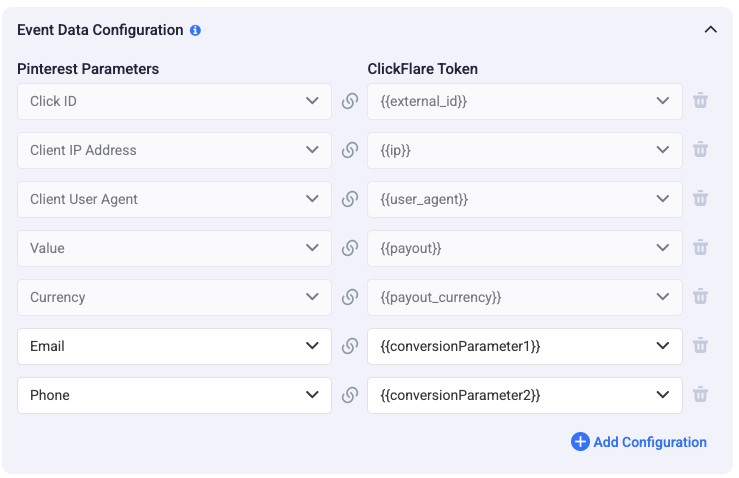
Step 3 — Configure Event Data and Additional Parameters
ClickFlare automatically includes required parameters in the Pinterest CAPI payload, such as:
-
Pinterest Click ID (epik) when tracked properly
-
IP Address
-
User Agent
-
Event time (timestamp)
-
Value & Currency (for purchase-related events)
-
Country / Region (where available)
You can optionally enrich events with additional match keys, e.g.:
-
Hashed Email
-
Hashed Phone
-
Other customer identifiers
ClickFlare will hash all sensitive data before sending it to Pinterest.
Note:
Some fields are required for proper attribution and cannot be removed.
If you use the Pinterest Traffic Source template, ClickFlare automatically appends required parameters (including the Pinterest click ID) to your campaign URLs.
Step 4 — Save and Verify the Integration
After mapping events and configuring data:
-
Click Save
-
Trigger a test conversion in your funnel
-
Go to Pinterest Ads Manager → Conversions → Event history/testing
-
Confirm the event appears with Source = API / Conversions API
If the event shows — integration is active ✔️
Troubleshooting
| Issue | Possible Cause | Solution |
|---|---|---|
| No events received | Invalid Access Token or Pixel ID | Regenerate a new Access Token and verify your Pixel ID. |
| Events showing as “Invalid Click ID.” | Missing Pinterest click ID (epik) | Ensure your campaign uses the Pinterest Traffic Source template |
| Low match rate | Missing user data | Add additional match keys like Email, IP, or User Agent. |
| Some conversions missing | Event not mapped | Confirm event mapping and that the ClickFlare event fires |
FREQUENTLY ASKED QUESTIONS
Got questions? Find the answers below:
Q1: Do I need the Pinterest Tag script installed?
A1: No, CAPI can work alone.
However, Pinterest recommends using Tag + CAPI together for the best deduplication and attribution accuracy.
Q2: Which events should I send?
A2: Typically:
-
Checkout / Purchase
-
AddToCart
-
Lead / Signup
-
ViewContent / PageVisit / ViewCategory
Pinterest supports a defined set of event names — always map to a valid event type.
Q3: Where do I find the credentials again?
A3: Ad Account ID & Conversion Token → Conversions → Set Up API / Conversion Access Token
Q4: Do I need to manually add Pinterest click parameters to URLs?
A4: No, ClickFlare automatically includes them when using the Pinterest Traffic Source template.