Thanks to ClickFlare's API integration with System1 RSOC, you'll be able to have conversions and revenue accurately pulled automatically into ClickFlare.
Note: The frequency conversions and revenue are pulled varies depending on your subscription plan.
In this article, we'll go over the step-by-step process of setting up the API Integration with System1.
What you'll need for the integration:
- An active System1 Account.
- An active ClickFlare Account.
- Your System1 Auth. Key
Adding the System1 integration to ClickFlare.
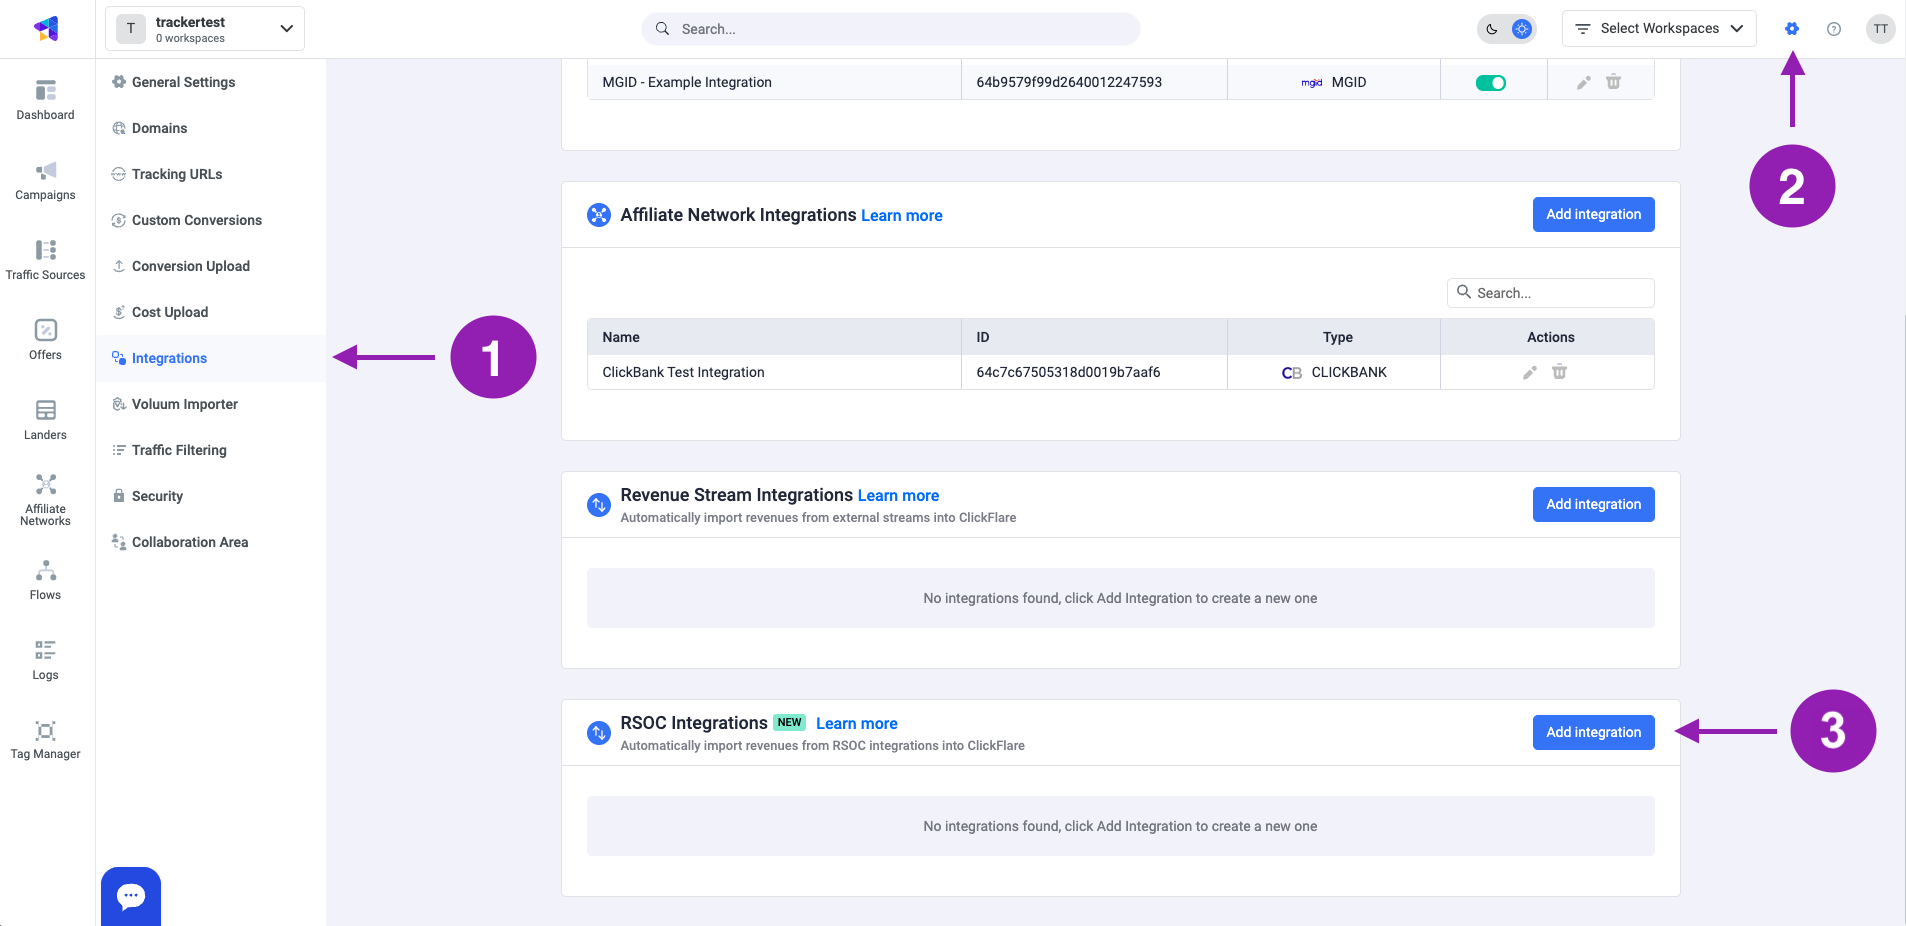
To add System1 integration to your ClickFlare account, begin by accessing the Integrations Menu, found under the Settings Menu (gear icon).
- Under RSOC Integrations, click Add Integration.

- Choose the System1 template
- Give your new integration a Name.
Note: Have your integrations' connection info ready before proceeding to connect it with ClickFlare.
- Under Accounts, click on + Connect Account.
- Enter the account name, auth key and click on Save.
- Move on to choosing the custom conversion, you want to attribute the conversion event to.
To learn how to add a custom conversion in ClickFlare, follow our article here.

- Lastly, click on Save.
You’ll see the new integration appear under the Revenue Stream Integrations section
Offer URL template for System1:
https://your_domain/?segment=REPLACE_SEGMENT&subid={campaign_id}&headline=REPLACE&optkey=REPLACE&forceKeyA=REPLACE&forceKeyB=REPLACE&network=facebook&nonrevsubid={cf_click_id}&impression_track_url=https%3A%2F%2Fyour_tracking_domain%2Fcf%2Fcv%3Fclick_id%3D%7Bcf_click_id%7D%26ct%3Dimpression&search_track_url=https%3A%2F%2Fyour_tracking_domain%2Fcf%2Fcv%3Fclick_id%3D%7Bcf_click_id%7D%26ct%3Dsearch&click_track_url%3Dhttps%3A%2F%2Fyour_tracking_domain%2Fcf%2Fcv%3Fclick_id%3D%7Bcf_click_id%7D%26ct%3Dclick
It's crucial to append the following parameter to your offer URLs:
• The ClickFlare click ID: "&nonrevsubid={cf_click_id}"
• The ClickFlare campaign ID: "subid={campaign_id}"
If you fail to append the {cf_click_id}, your postbacks will not fire and ClickFlare will not pull any revenue from System1.
If you fail to send the {campaign_id} in the subid parameter, you'll not have same day revenue. The revenue will be reflected starting from the next day
Make sure that the postback are encoded correctly. For instance, only the postback after the equal sign should be encoded.
If your postbacks are:
&search_track_url=https://your_tracking_domain.com/cf/cv?click_id={cf_click_id}&ct=search&click_track_url=https://your_tracking_domain.com/cf/cv?click_id={cf_click_id}¶m10=SEGMENT_NAME&ct=clickThe enocded postback should look like this:
&search_track_url=https%3A%2F%2Fyour_tracking_domain.com%2Fcf%2Fcv%3Fclick_id%3D%7Bcf_click_id%7D%26ct%3Dsearch&click_track_url=https%3A%2F%2Fyour_tracking_domain.com%2Fcf%2Fcv%3Fclick_id%3D%7Bcf_click_id%7D%26param10%3DSEGMENT_NAME%26ct%3Dclick
Failing to encode the postbacks correctly, will cause them to break and not report conversions correctly.
Postback template for System1
The postbacks go directly in the offer URL (check offer URL oabove)
These are the postbacks:
impression_track_url=https://your_tracking_domain/cf/cv?click_id={cf_click_id}&ct=impression
search_track_url=https://your_tracking_domain/cf/cv?click_id={cf_click_id}&ct=search
click_track_url=https://your_tracking_domain/cf/cv?click_id={cf_click_id}¶m10=SEGMENT_NAME&ct=click
Glossary:
optkey - Like referring ad creative, optkey is another content-based hint for term optimization. Note, “headline” has a stronger hierarchy in terms of influence on the terms, so the preference should be on providing optimal “headline” values.
forceKey - The forceKey URL parameter is one way to specify the terms you’d like the user to see in the RSoC widget. If you choose this strategy, you’ll set forceKeyA as the first term, forceKeyB as the second term, and so on, as shown in this example:
Please note:
-
You can only pass one keyword per forceKey.
-
You should provide at least six unique forceKey terms (A - F) to ensure there are enough terms for all RSoC widgets on the page.
-
If you’d like your page to feature more than one RSoC block, please notify your account manager first. You must then provide enough keywords to populate both blocks, and all keywords must be unique across both blocks.
segment - It's a bucket of traffic; typically a buyside account. If no segment is passed, System1 uses the “default” segment, and this will not affect the rest of the URL params sent.
subid - More granular performance tracking at a campaign, adgroup, etc. level. You have a finite number of subids per day. Once you reach that limit, new subids will stop being tracked. Your account manager will be notified when you get close to the limit.
nonrevsubid - The most granular performance tracking but does not include revenue. There is no limit on the cardinality of this parameter.
Related Resources: