What is a Custom Tracking Domain?
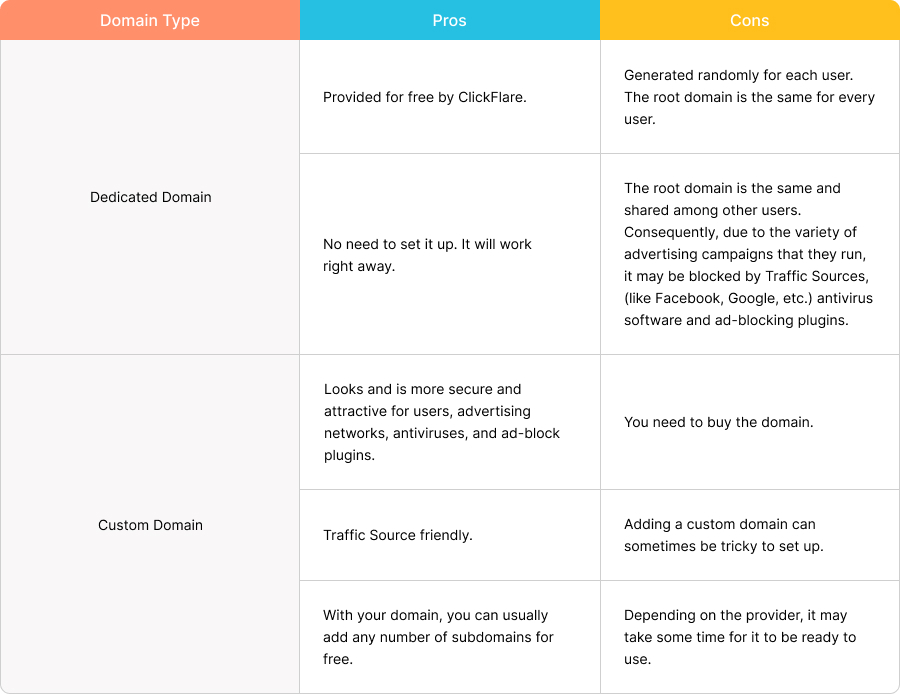
A custom tracking domain is just a normal domain that is used for tracking purposes, meaning that this domain will be used to generate all your tracking links, pixels and scripts. What makes it custom, is that this is your own domain, that you buy, and you can customize and personalize as you wish. Unlike a dedicated domain, which is shared with other users, this domain is only yours and being so, independent of other users’ activity.
Why do you need a Custom Domain?
We highly recommend using a custom domain. The reason being that if the dedicated domain gets flagged by your Traffic Source, you'd need to request for a new one from our support. Whereas having your own custom domain would give you the convenience of replacing it yourself without having to wait on support.
Additionally, having a custom domain gives you the possibility to customize the campaign, click URLs, and tracking pixel URLs selectively (per campaign) with a domain of your choice.
Pros and Cons of using a Custom Tracking Domain

How do I get a Custom Tracking Domain?
You can get a custom domain from a domain provider such as: Cloudflare, Namecheap and GoDaddy.
Adding a Custom Domain
I. Setting up the Custom Domain in ClickFlare
The setup in ClickFlare is pretty straightforward. Go to Settings and click on Domains in the left-side menu. Lastly, click on the Add Custom Domain button.

A new window will appear. Insert your domain or subdomain name, as shown below, and click on Save.

You’ll see your newly created domain, appear under the custom domain’s list. Click on the info icon next to your domain name.

In the Domain Verification window, you’ll find all the necessary info you need to finish setting up your custom tracking domain, on the provider’s (or registrar's) side.
Let’s jump now on the domain’s provider side and see what you need to do to finish this process.
II. Configure the Custom Domain on the Provider's Side
The process may slightly vary from one registrar to the other, but each one follows (roughly) the same configuration steps. For a detailed guide on how to set up your custom tracking domain in Cloudflare, Namecheap or GoDaddy, check our individual guides.
Go to the domain provider of your choice and follow these steps:
- Select the domain you intend to use (if you have more than one).
- Go to the DNS settings of the selected domain.
- Create e new CNAME record and fill in the fields (Host and Value) with the exact values from ClickFlare (see the previous image). For the TTL select the lowest value available.
Note: This step is necessary to point your custom domain to your ClickFlare dedicated domain. - Create a new TXT record and, as before, fill in the fields. The values should exactly match the ones you got from ClickFlare.
Note: This step is necessary to verify the ownership of your domain.The next step may vary depending on the domain provider. If an SSL verification is required, follow all the remaining steps. If not, then you can jump directly to the last step. - Return to ClickFlare and in the Domain Verification Info window, you’ll see a third row (see image below). Copy the name and value.

- Back to your domain provider. Create a new TXT record for your custom tracking domain and paste the values you just copied.
Note: It may take some time for the DNS to propagate. The time it takes varies depending on the domain provider you’re using. In some cases, it can even take up to 48h (or more).Pro Tip: The fastest and most reliable domain provider is Cloudflare. From our experience with Cloudflare, within an hour (most of the time less) you should be ready and good to go. So that’s why we highly recommend using Cloudflare. - When you see a green active tag next to your domain name in ClickFlare, it means that your domain is ready to use.

Congratulations, you can start tracking with your custom domain!