This guide shows you how to track CartPanda sales in ClickFlare using a server-to-server (S2S) postback integration.
You will:
-
Create a custom conversion in ClickFlare called Sale (Optional)
-
Add the CartPanda affiliate network
-
Add your traffic source
-
(Optional) Add a landing page
-
Create an offer using your CartPanda promolink with &cid={cf_click_id}
-
Configure the CartPanda S2S postback
-
Create a tracking campaign
-
Use the ClickFlare campaign URL to send traffic
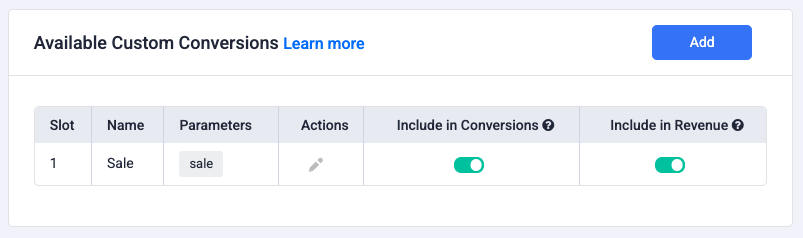
Step 1 – Create the Sale Custom Conversion (Optional)
-
Go to Settings → Custom Conversions
-
Add a new conversion
-
Name: Sale
-
Enable Include in Conversions and Include in revenue
-
Save
Step 2 – Add the CartPanda Affiliate Network
-
Go to Affiliate Networks → Add new
-
Select CartPanda from templates
-
Apply and save

This preconfigures the correct click ID parameter (cid).parameters to be used in the postback.
Step 3 – Add Your Traffic Source
-
Go to Traffic Sources → Add traffic source
-
Select your traffic platform template (Google Ads, Meta Ads, TikTok, etc.)
-
Save
This allows ClickFlare to generate proper tracking URLs.
Step 4 – (Optional) Add a Landing Page
If you want to send users through an advertorial before CartPanda:
-
Go to Landers → Add new
-
Enter your advertorial URL
-
Save
You can skip this step if you want to send traffic directly to CartPanda.
Step 5 – Create the Offer Using Your CartPanda Promolink
CartPanda uses what they call a promolink — essentially your CartPanda product or checkout URL that you promote.
To allow ClickFlare to track sales, you must append the ClickFlare click ID to this promolink.
-
Go to Offers → Add offer
-
Select the CartPanda affiliate network
-
Paste your CartPanda promolink (product/checkout URL)
-
Append ClickFlare’s click ID parameter:
&cid={cf_click_id}
Example promolink properly formatted for ClickFlare tracking:
https://yourstore.cartpanda.com/checkout?coupon=SUMMER&cid={cf_click_id}
📌 About the Promolink
CartPanda uses the checkout/product URL as the “promolink.”
The only requirement for ClickFlare is that the promolink must include cid={cf_click_id}, so the click ID is captured and returned in the S2S postback.
This ensures:
-
ClickFlare assigns a unique click ID for every user
-
CartPanda receives and stores that click ID
-
CartPanda later sends the same ID back to ClickFlare via postback
-
The sale is attributed to the correct click
5. Save the offer.
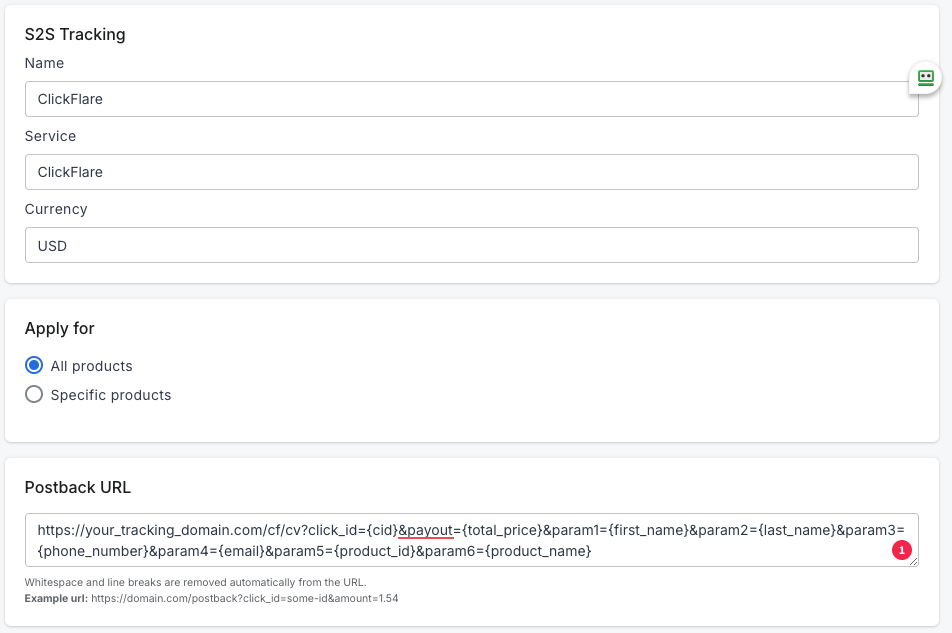
Step 6 – Configure the S2S Postback in CartPanda
Your ClickFlare postback should look like:
https://your_tracking_domain.com/cf/cv?click_id={cid}&payout={total_price}¶m1={first_name}¶m2={last_name}¶m3={phone_number}¶m4={email}¶m5={product_id}¶m6={product_name}
Then in CartPanda:
-
Go to Admin → Tracking & Scripts → S2S Tracking
-
Create New Integration
-
Name it (e.g., ClickFlare Sales)
-
Paste your postback URL
-
Activate integration
-
Save
Step 7 – Create a Tracking Campaign in ClickFlare
-
Go to Campaigns → Add campaign
-
Choose Redirect or Direct
-
Select your Traffic Source
-
Select your Offer (the CartPanda promolink from Step 5)
-
(Optional) Select your Lander
ClickFlare will now generate your Campaign URL.
Step 8 – Use the ClickFlare Campaign URL in Your Traffic Source
Copy the Campaign URL and paste it into:
-
Google Ads → Final URL
-
Meta Ads → Website URL
-
TikTok Ads → Destination URL
-
Taboola/Outbrain → URL field
Traffic will now flow:
Traffic Source → ClickFlare → (Optional Lander) → CartPanda Promolink → CartPanda Postback → ClickFlare Conversion
Step 9 – Test the Setup
-
Open the ClickFlare campaign URL
-
Make a test purchase in CartPanda
-
Check ClickFlare → the Sale event should be recorded
Troubleshooting
Conversion not tracked?
-
Ensure the promolink contains &cid={cf_click_id}
-
Ensure the CartPanda postback includes cid={cid}
-
Confirm the integration is active
-
Ensure you are using the ClickFlare campaign URL in your ads
FREQUENTLY ASKED QUESTIONS
Got questions? Find the answers below:
Q1: Do I have to name the conversion “Sale”?
A1: No. You can name the conversion anything you prefer. Just ensure the conversion name matches the value you pass in the ct parameter of your ClickFlare postback URL if you choose to use that parameter.
Q2: Do I need a landing page to track CartPanda sales?
A2: No. Using a lander is optional. You can send traffic directly from your ads to the CartPanda checkout URL as long as it includes &cid={cf_click_id}.
Q3: What happens if I forget to append cid={cf_click_id} to the offer URL?
A3: CartPanda will not receive the ClickFlare click ID, which means the S2S postback cannot match the sale to a click. No conversions will be tracked.
Q4: Which value should I use for payout — {total_price} or {amount_affiliate}?
A4: Use {total_price} if you want ClickFlare to record gross sales revenue.
Use {amount_affiliate} if you want to track your actual affiliate commission instead.
Q5: Can I add additional data to the postback (email, product, etc.)?
A5: Yes. CartPanda supports additional tokens like {email}, {product_name}, {first_name}, etc. You can append them as optional parameters for more detailed reporting.
Q6: Does the ClickFlare campaign need to be active before testing purchases?
A6: Yes. The test click must originate from a ClickFlare campaign URL so that a valid click ID is generated before triggering a test purchase.