Quick Setup Checklist
-
Create Glitchy Affiliate Network in ClickFlare
• Add from template → copy ClickFlare postback URL. -
Add Glitchy Offer in ClickFlare
• Select Glitchy as the network → paste offer URL → toggle Append Click ID. -
Set Postback in Glitchy
• Open the same offer in Glitchy → paste ClickFlare postback into Conversion Attribution Postback. -
Create Campaign in ClickFlare
• Select your Glitchy offer + traffic source → use the ClickFlare campaign URL in your traffic source.
👉 Done! Clicks and conversions will now flow between Glitchy and ClickFlare.
Introduction: What is Glitchy?
Glitchy is an offer aggregator and affiliate network hub that connects advertisers and publishers with a wide range of performance marketing offers. Instead of working with individual affiliate programs, marketers can access hundreds of offers through one platform. By integrating Glitchy with ClickFlare, you can track clicks, conversions, and payouts in real time, ensuring accurate attribution and campaign optimization.
Before You Begin
Make sure you have:
-
An active ClickFlare account
-
An active Glitchy account
-
Access to both platforms’ tracking and postback settings
1. Add Glitchy as an Affiliate Network in ClickFlare
ClickFlare provides a ready-made template for Glitchy, which makes setup simple.
-
In your ClickFlare dashboard, go to Affiliate Networks.
-
Click Add New Network.
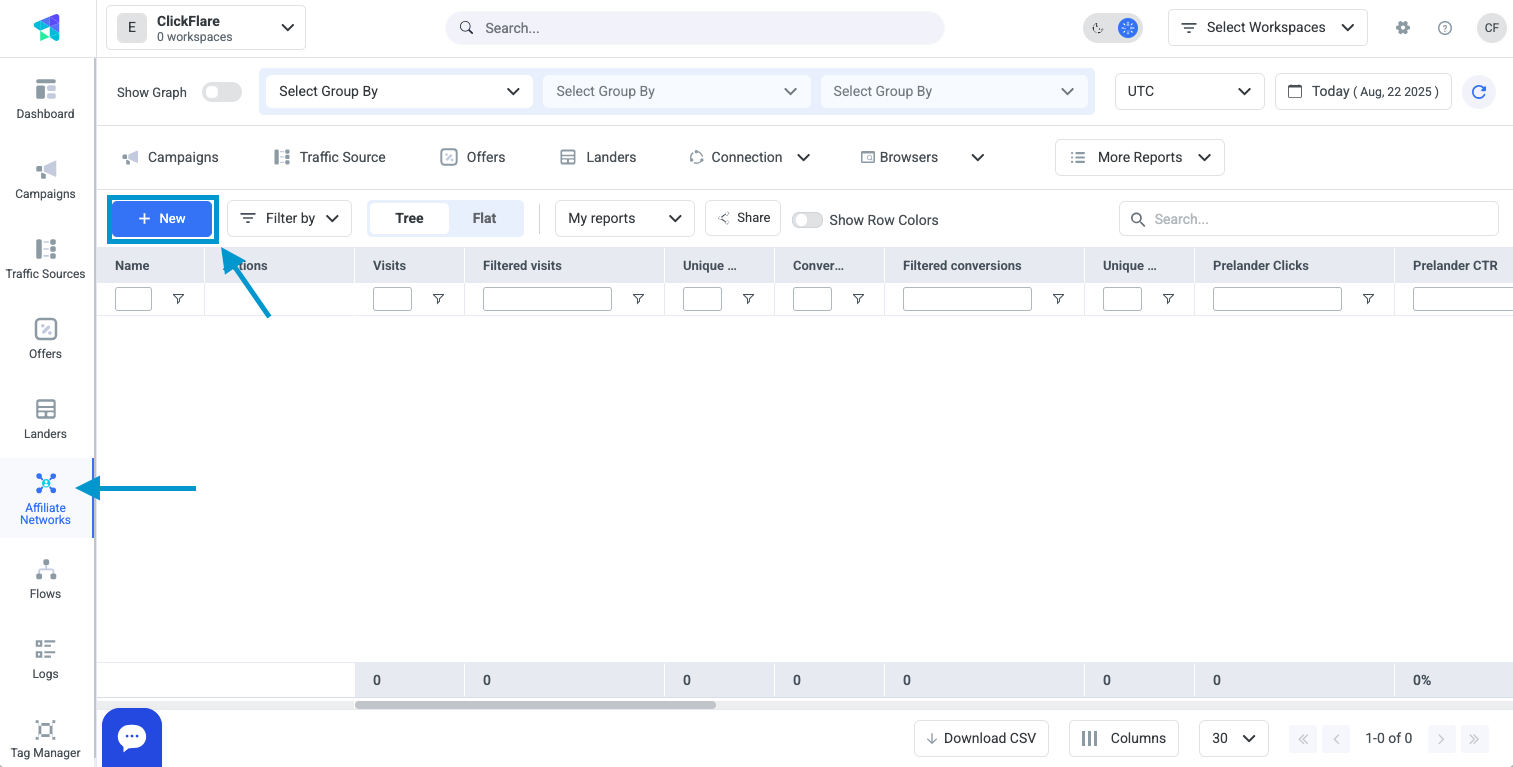
-
From the template list, select Glitchy.
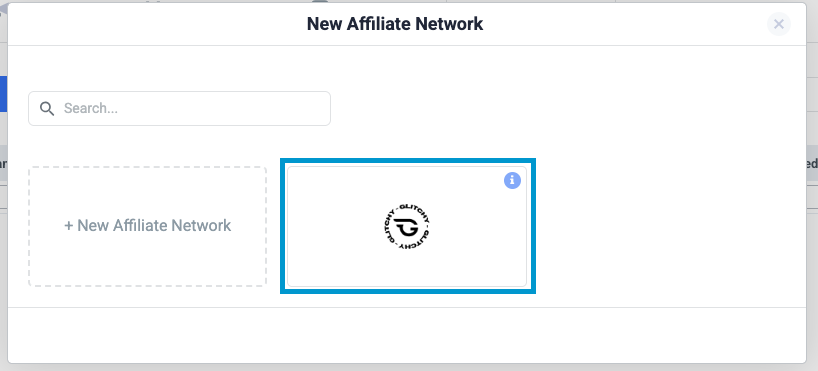
-
The template will automatically generate the proper ClickFlare Postback URL:
https://webeasyhit.com/cf/cv?click_id={source}&payout={payout} -
Copy this URL — you will need it to configure postback tracking in Glitchy.
-
Save the Glitchy network in ClickFlare.
2. Add a Glitchy Offer to ClickFlare
A. Get the Offer Link from Glitchy
-
Log in to Glitchy.
-
Go to the Offers section.
-
Find the offer you want to promote and copy the affiliate link.
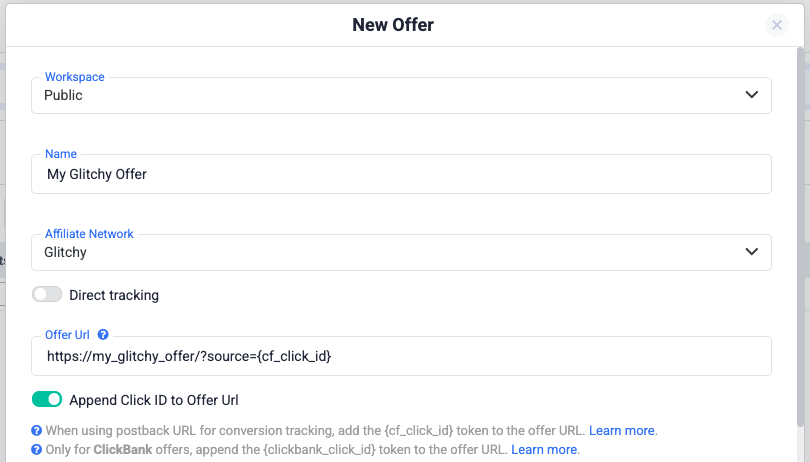
B. Configure the Offer in ClickFlare
- In ClickFlare, go to Offers → New Offer.
- Choose Glitchy as the affiliate network (created in Step 2).
- Enter a descriptive offer name.
- Paste the offer URL you copied from Glitchy.
- Toggle Append Click ID so ClickFlare automatically adds its click identifier to the offer URL as "
source={cf_click_id}" (see image below):
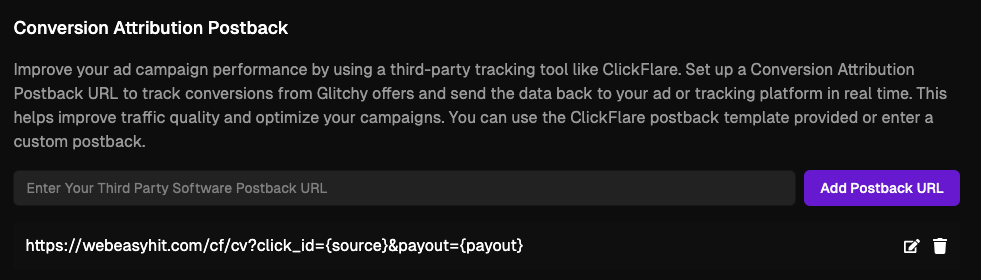
3. Add ClickFlare Postback to Glitchy
To make sure conversions are sent back from Glitchy to ClickFlare:
- Log in to your Glitchy account.
- Go to the Offers section and open the same offer you configured in Step 2.
- In the offer settings, locate the Conversion Attribution Postback field.
- Paste the ClickFlare postback URL you copied in Step 1 (see image below):
https://webeasyhit.com/cf/cv?click_id={source}&payout={payout} - Click on Add Postback URL - a preview of the postback URL will show under the postback input field form
⚡ Next Step: Create a Campaign in ClickFlare
With the affiliate network, offer, and postback set up, the final step is to create a campaign in ClickFlare. Select your Glitchy offer and a traffic source, then use the generated ClickFlare campaign URL in your traffic source to start tracking.
Note: Campaign creation works the same way for all affiliate networks in ClickFlare, so the steps are always identical.
How the Integration Works
| Step | Action |
|---|---|
| 1 | User clicks a ClickFlare campaign link in the traffic source (your ad) |
| 2 | ClickFlare records the click and redirects the user to the offer (with source={cf_click_id} appended.) |
| 3 | On conversion, Glitchy fires the ClickFlare postback for that offer. |
| 4 | ClickFlare attributes the conversion to the correct click and logs revenue/payout. |
Testing the Setup
-
Click Test: Open the ClickFlare campaign URL in your browser and confirm the click appears in ClickFlare.
-
Conversion Test: Trigger a test conversion in Glitchy and verify it is logged in ClickFlare with payout data.
Summary Table
| Component | Purpose | Example Setup |
|---|---|---|
| Affiliate Network | Glitchy template in ClickFlare | Preconfigured with ClickFlare postback |
| Offer URL | Sends traffic & passes click ID | ...&source={cf_click_id} |
| Postback URL | Sends conversions from Glitchy to ClickFlare | https://webeasyhit.com/cf/cv?click_id=...&payout=... |
| Tokens | Enable proper attribution & payout logging | {click_id}, {payout} |
Final Notes
-
Always double-check token mapping between Glitchy and ClickFlare.
-
Set the Conversion Attribution Postback at the offer level in Glitchy to ensure proper tracking.
-
Test both clicks and conversions before scaling traffic.
-
Monitor dashboards in both systems to confirm that data matches.
👉 With these steps complete, your ClickFlare ↔ Glitchy integration is ready. You can now track offers, clicks, and conversions with full accuracy.
FREQUENTLY ASKED QUESTIONS
Got questions? Find the answers below:
Q1: Do I always need to toggle “Append Click ID” when adding offers?
Q2: Can I track payouts from Glitchy in ClickFlare?
A2: Yes. Make sure the {payout} token is included in the postback. This will allow ClickFlare to log revenue per conversion.
Q3: What happens if I don’t add the postback in Glitchy?
A3: Clicks will still be tracked in ClickFlare, but conversions will not be recorded. Postback setup is required for conversion attribution.
Q4: Do I need to repeat the setup for every offer?
A4: You only need to add the Glitchy network once in ClickFlare. For each new offer, you’ll add it separately under Offers and link it to the existing Glitchy network.
Q5: Is campaign setup different for Glitchy compared to other networks?
A5: No. Campaign creation in ClickFlare works the same way regardless of the affiliate network.