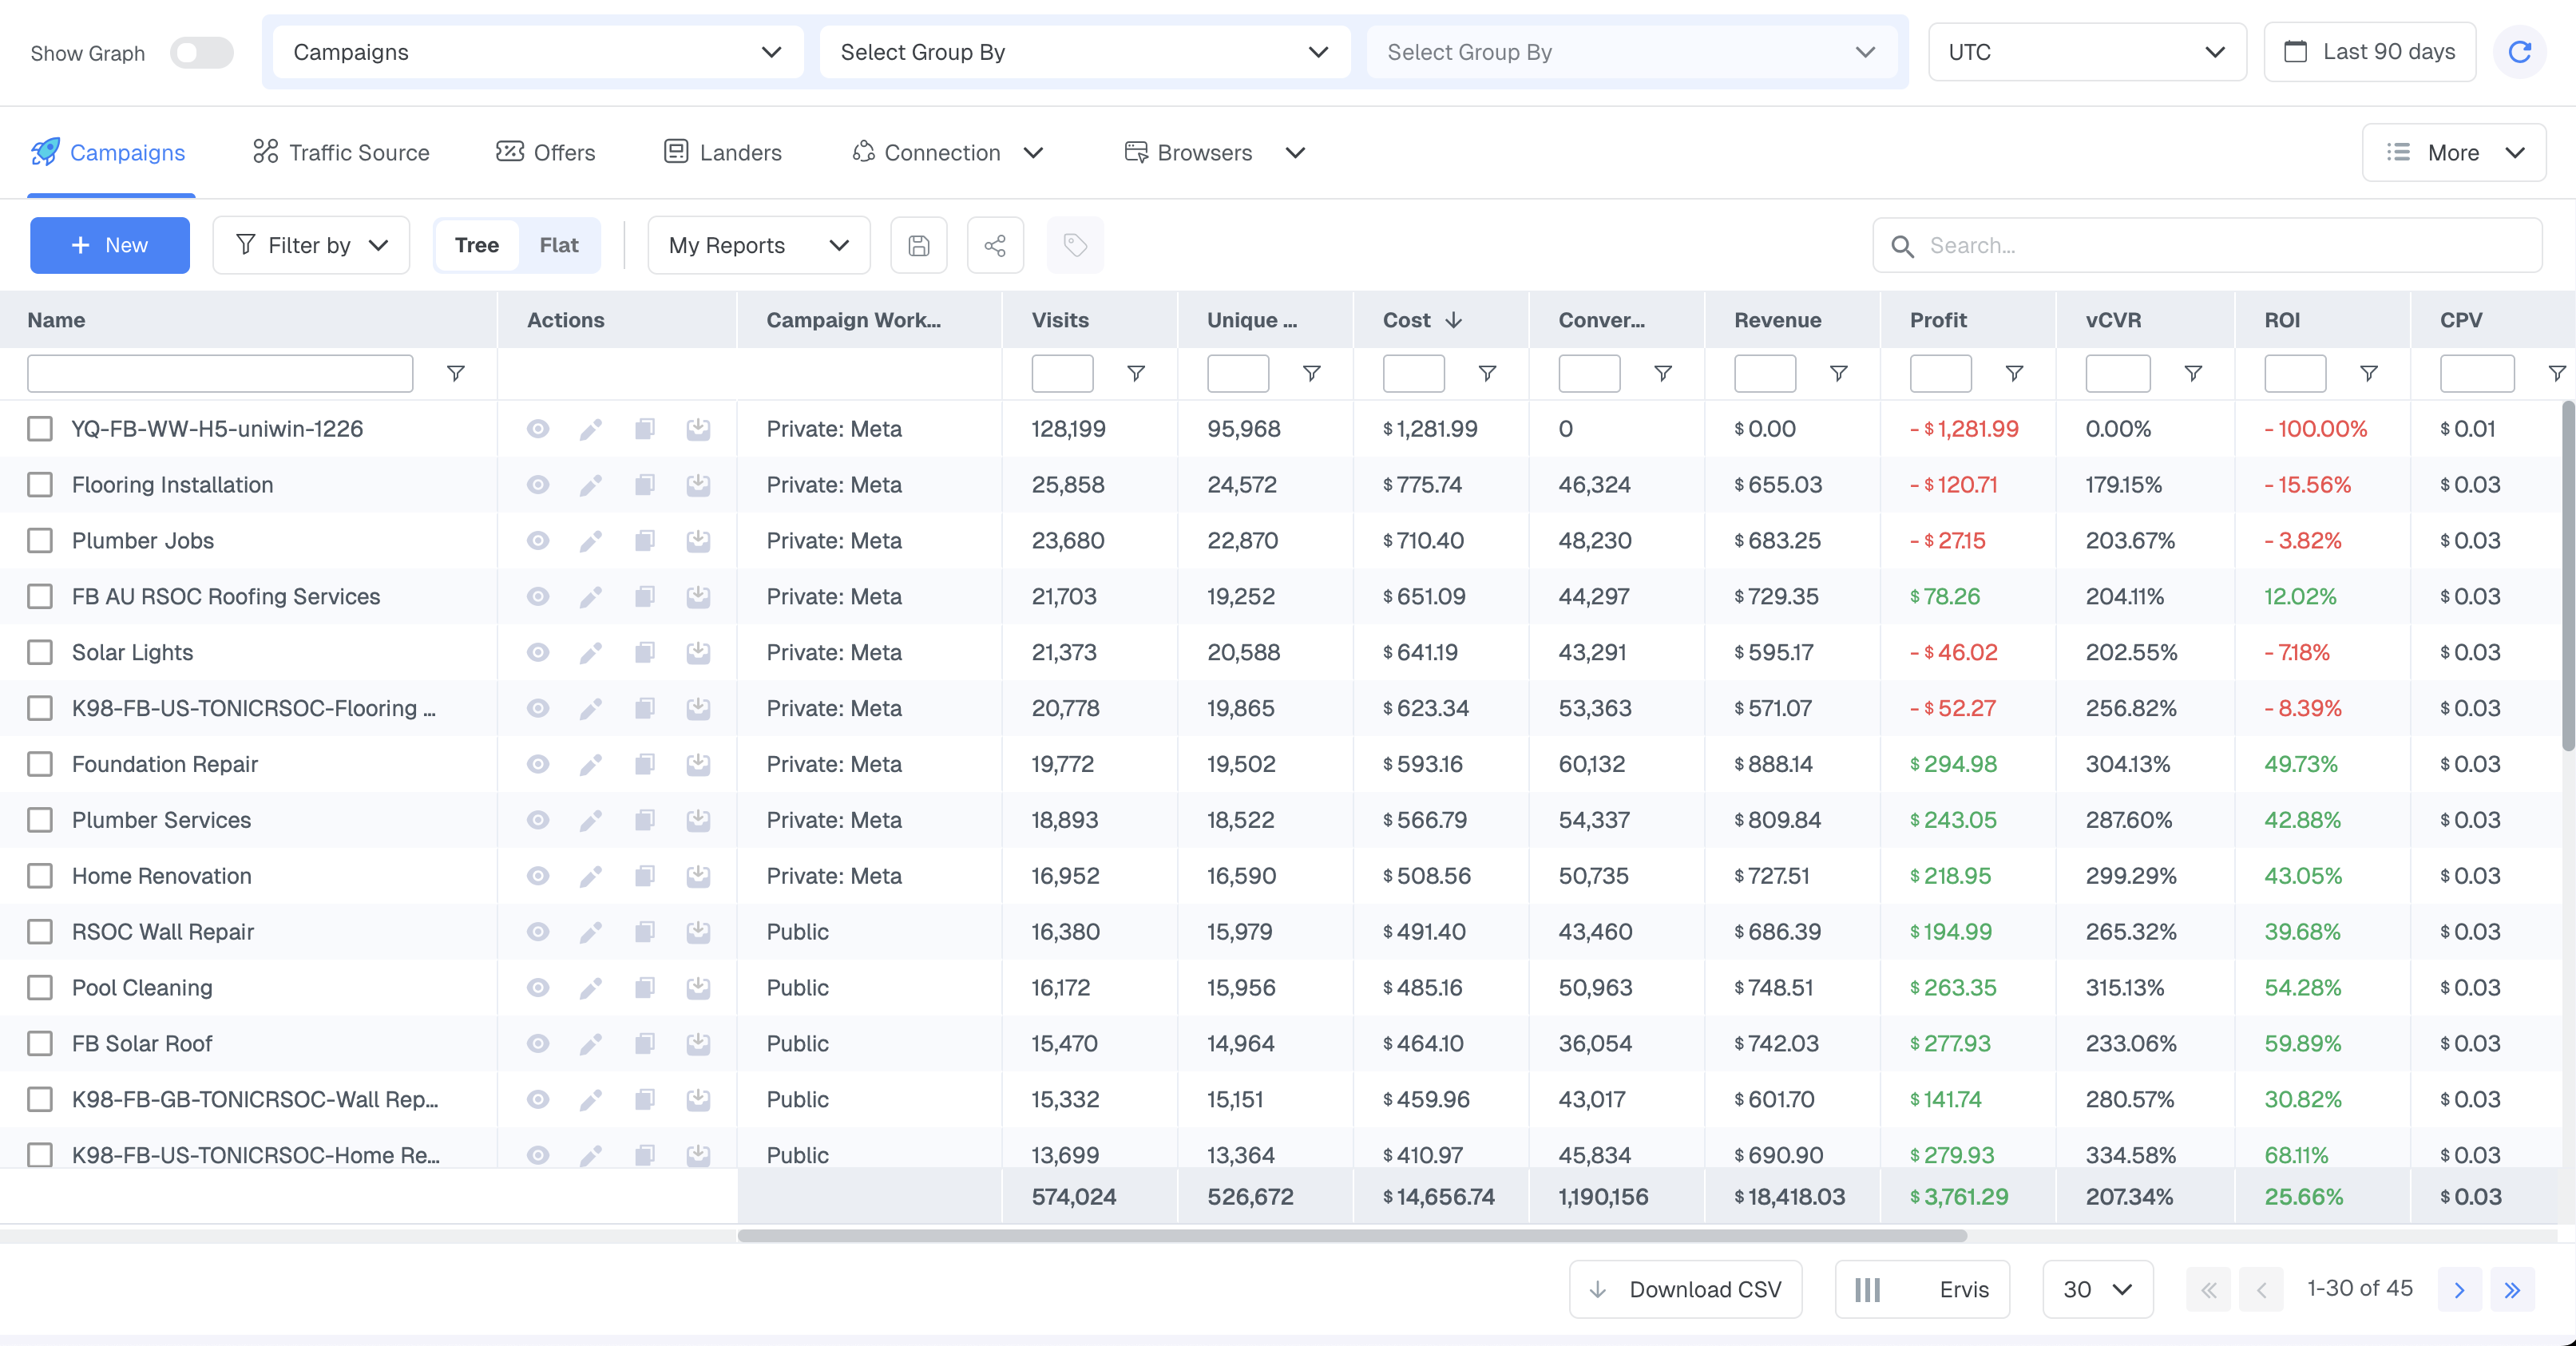
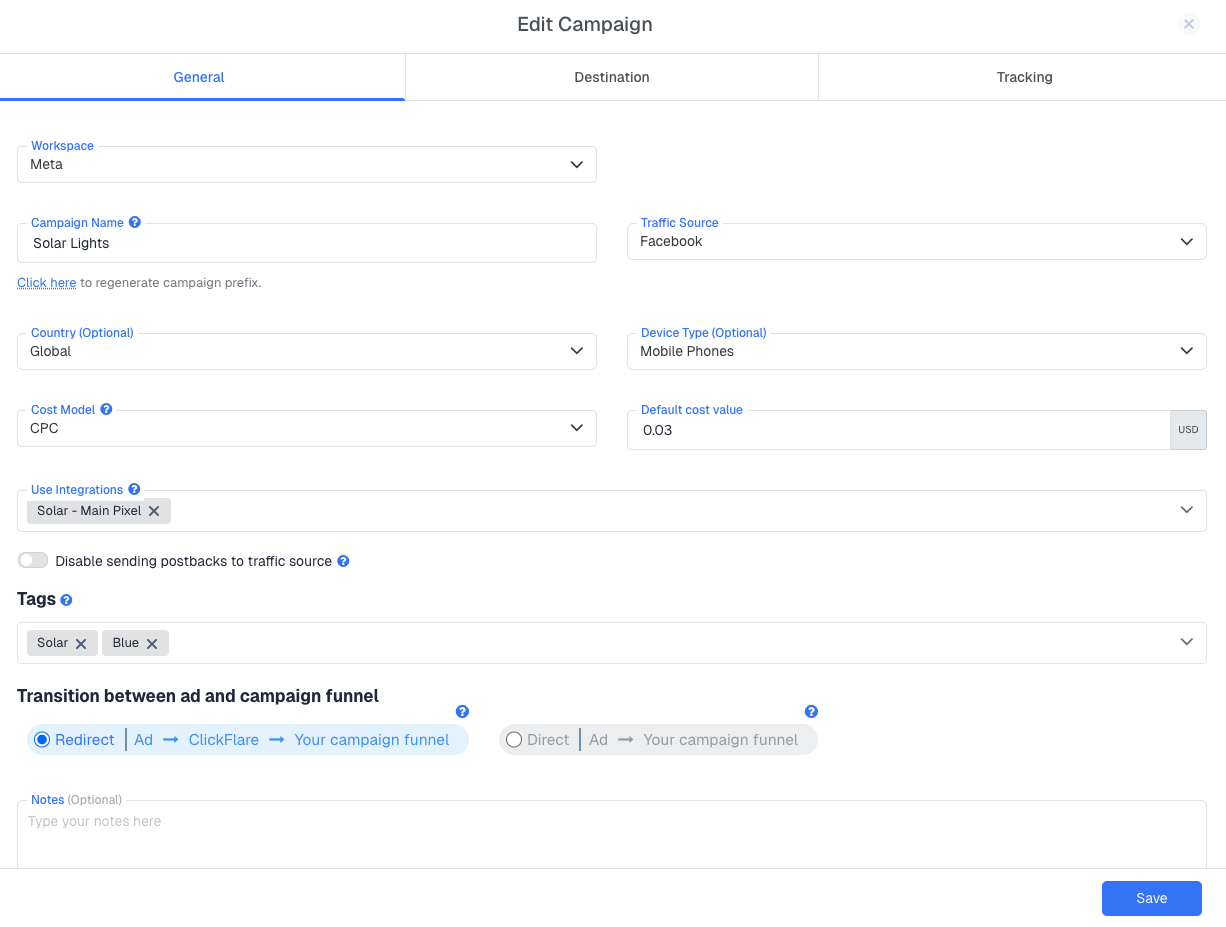
What a Campaign Contains
Every setting in the campaign form maps to one of two categories: required elements that define how the campaign works, and optional fields that add organisation or extra functionality.
Required fields
- Traffic Source — the ad platform sending you traffic (Meta, TikTok, Google Ads, and so on). Selecting it tells ClickFlare which URL parameters to expect and how to attribute visits back to individual ads.
- Tracking Type — either Redirect or Direct. Determines how ClickFlare intercepts the visit before sending the visitor onward. Covered in detail in the section below.
- Flow and Path — the destination logic. Defines where visitors go after ClickFlare records the visit: straight to an offer, through a landing page, or through a conditional routing rule.
- Cost Model — how ad spend is calculated. Without it set correctly, cost shows as $0.00 and Profit and ROI become meaningless.
Optional fields
- Workspace — assigns the campaign to a workspace, controlling visibility across your team or clients.
- Country and Device Type — organisational labels used to filter campaigns in the table view. They do not affect tracking or routing.
- Integrations — connects Conversion API so ClickFlare can push conversion data back to your traffic source automatically.
- Tags — custom keywords for easier searching and filtering across your campaign list.
- Disable sending postbacks to traffic source — stops ClickFlare from firing conversion postbacks upstream. Useful when testing without polluting your traffic source's data.
- Notes — a free-text field for recording the campaign's objective, target audience, or test hypothesis.
How Tracking Flows Through a Campaign
When a visitor clicks your ad, the following sequence happens:
- The visitor's browser requests your Campaign URL, the tracking link you placed in the ad as the destination URL.
- ClickFlare intercepts the request, reads the URL parameters passed by the traffic source (ad ID, cost, placement, and so on), and records a Visit.
- ClickFlare assigns a unique Click ID to that visit and stores all captured parameters against it.
- ClickFlare evaluates the campaign's Flow to determine which path applies to this visitor.
- The visitor is sent to the destination defined by that path: a lander, an offer, or both in sequence.
- When a conversion happens on the offer, the network fires a postback back to ClickFlare containing the Click ID. ClickFlare matches it to the original visit and records a Conversion.
Every metric in your reports (visits, clicks, conversions, revenue, cost, profit, ROI) is produced by this sequence. If any step breaks, the metrics downstream of that break will be missing or incorrect.
Tracking Type: Redirect vs. Direct
The tracking type is the most fundamental choice in a campaign. It determines how ClickFlare physically intercepts the visit and whether a redirect through ClickFlare's servers is involved.
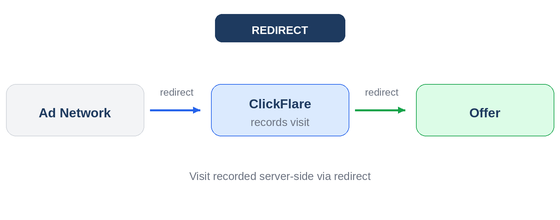
Redirect Tracking
In a Redirect campaign, every visitor passes through ClickFlare's servers before reaching the destination. ClickFlare receives the click, records the visit, evaluates the path, and redirects the visitor onward: all in a fraction of a second. This is the default and most widely used tracking type. It works with the vast majority of traffic sources and affiliate setups, requires no script on your landing pages, and supports the full range of ClickFlare features including path routing, A/B testing, and offer rotation.
The one exception is Google Ads, which prohibits redirect tracking URLs as ad destination URLs. For Google Ads, use Direct Tracking instead.
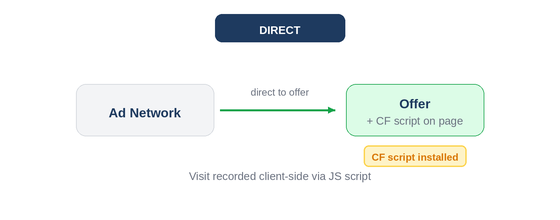
Direct Tracking
In a Direct campaign, traffic goes straight from the ad to the destination with no redirect through ClickFlare. Instead, ClickFlare's tracking script installed on the landing page handles visit capture using first-party cookies. This setup is required for Google Ads and any other platform that prohibits redirect URLs. Direct campaigns still support full conversion tracking via postback or pixel, and attribution works the same way in reports. The trade-off is slightly more setup: the script must be correctly installed on every landing page involved.
Start with Redirect. It works for Meta, TikTok, Taboola, native networks, and all standard affiliate setups. Switch to Direct only when your traffic source explicitly prohibits redirect URLs.
Transition Modes
Transition modes only apply to Redirect campaigns. They control how the redirect is technically executed and whether referrer data from your traffic source is passed through to the destination. There are three options, set inside each path on the Destination tab.
302
The standard HTTP redirect. It is the fastest option and passes referrer data through to the destination. Use 302 by default unless you have a specific reason to hide your traffic source domain from the offer or affiliate network.
Meta Refresh
Adds an intermediate page between ClickFlare and the destination. This intermediate page strips the original referrer before passing the visitor on, so the traffic source domain does not appear as the referrer at the offer. Use this when your affiliate network requires that the original traffic source is not visible.
Double Meta Refresh
Two meta refreshes performed in sequence. The first refresh page becomes the visible referrer at the destination instead of the original traffic source. This is the most reliable method for hiding the original referrer, but adds a small amount of latency due to the extra hop.
Some networks require the traffic source domain as the referrer for compliance. Others actively want it hidden. Confirm the network's requirements before choosing anything other than 302.
Cost Models
The cost model tells ClickFlare how to calculate ad spend for each visit or conversion recorded on this campaign. Getting this right is essential: without accurate cost data, Profit and ROI figures are meaningless.
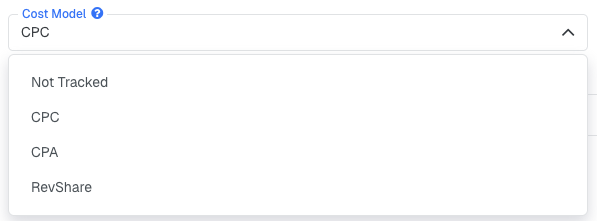
CPC (Cost Per Click)
You pay a fixed amount for every click. Enter the cost per click when creating the campaign and ClickFlare multiplies it by the number of visits recorded to calculate total spend. Best for search and display campaigns billed per click.
CPA (Cost Per Action)
You pay a fixed amount each time a conversion occurs. ClickFlare multiplies the cost per action by the number of conversions recorded to calculate total spend.
RevShare (Revenue Share)
You pay the traffic source a percentage of the revenue generated. Enter the percentage and ClickFlare automatically calculates cost as a proportion of each conversion payout. Common in affiliate and search arbitrage setups where the traffic source takes a cut of earnings.
Not Tracked
Cost is intentionally excluded. Even if the traffic source passes cost data via URL tokens, ClickFlare ignores it. The Cost column will always show $0.00. Use this only if cost tracking is genuinely not relevant to your setup, for example when running organic or owned traffic through ClickFlare purely for attribution purposes.
If your traffic source supports it, connect a Cost Tracking integration under Integrations. ClickFlare will pull actual spend data directly from your ad account at campaign and ad level, removing the need to set a fixed cost value per campaign.
Flow and Path Destinations
The Flow defines what happens to a visitor after ClickFlare records their visit. Every campaign must have at least one default path. A path has one job: decide where the visitor goes and in what order. You can also layer conditional paths on top of the default path, which fire only when a visitor matches a specific rule: a certain country, device type, or URL parameter value. If no conditional path matches, the visitor falls through to the default path.
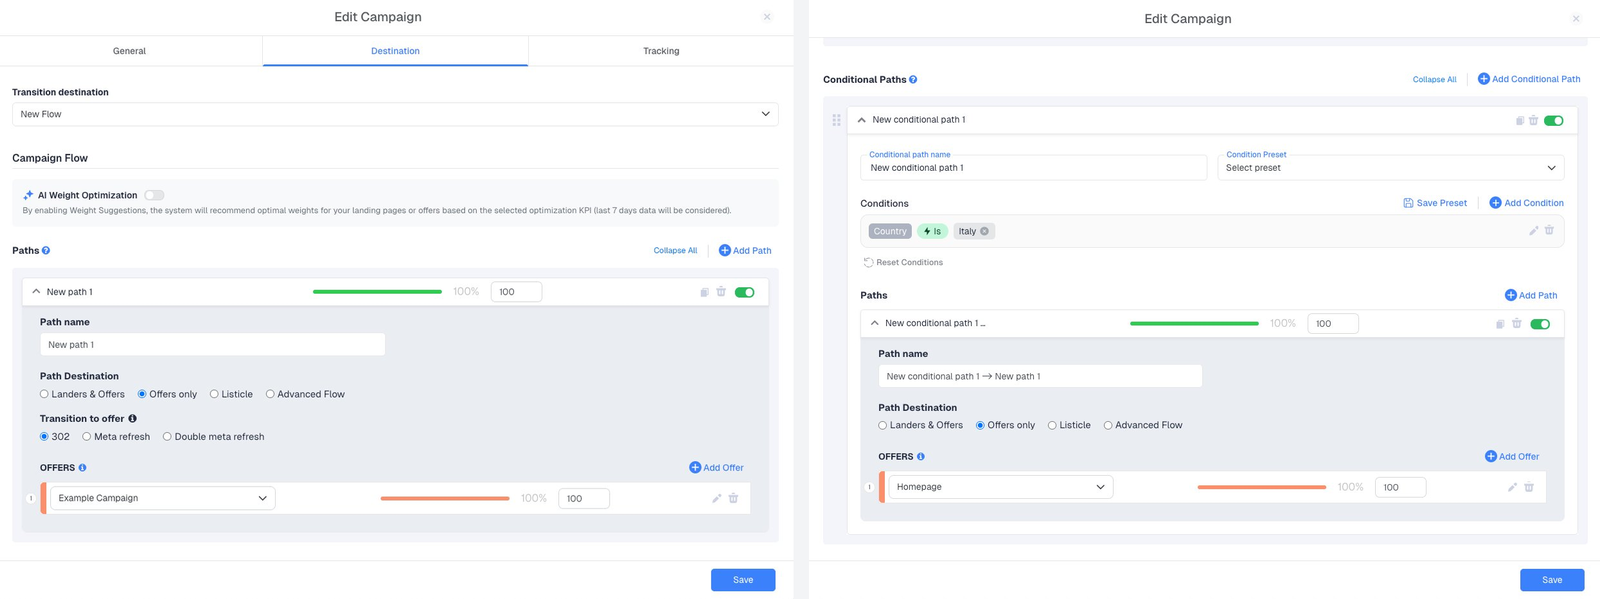
Offers Only
The simplest path. The visitor is sent directly from the Campaign URL to the offer with no landing page in between. This is the recommended starting point when testing tracking for the first time or running a direct-to-offer affiliate setup.
Landers and Offers
The visitor goes to a landing page first, then clicks through to the offer. Adding a lander unlocks CTR tracking between the lander and the offer, and enables lander-level A/B testing and rotation. Use this when the quality of your pre-sell page is a meaningful variable in your funnel.
Listicle
A fixed three-step funnel: Prelander, then Lander, then Offer. The prelander contains links to multiple landers, and each lander links to its own offer. The visitor self-selects their path by clicking a link on the prelander. There is no weight-based rotation — each lander and offer is reached only through a direct click, not distributed automatically by ClickFlare.
Advanced Flow
A multi-step funnel builder that allows up to four sequential steps — for example, Lander, then Lander, then Lander, then Offer. At each node in the flow you can add multiple elements and assign traffic weights across them, so ClickFlare distributes visitors between options automatically at every level of the funnel. Use Advanced Flow when you need deeper funnels or want to A/B test multiple landers and offers simultaneously at different stages.
The Campaign URL and Tracking Tab
After saving a campaign, the Tracking tab gives you everything you need to connect ClickFlare to your ad and your affiliate network.
The Campaign Tracking URL is the link you paste as the destination URL in your ad. Every click passes through this URL first. Do not edit the parameter tokens in it manually — they look like {{ad.id}} or {{campaign.id}} and are filled in automatically by your ad platform at click time. An Encode URL query parameters toggle is available if your destination URL contains characters that need encoding.
The Click URL and Multi Offer Click URL are used when you have a landing page that contains multiple offer links and you want ClickFlare to record a Click event when a visitor taps one. Paste these into your lander instead of direct offer URLs.
The Campaign ID is a unique identifier for this campaign. You may need it when configuring integrations or troubleshooting with support.
The Postback URL is the URL you give to your affiliate network. When a conversion fires, the network calls this URL and passes back the Click ID, allowing ClickFlare to match the conversion to the original visit. The Include additional parameters toggle expands the URL with optional payout and transaction ID fields.
The Conversion Tracking Script is an alternative to the postback for tracking conversions via JavaScript. Paste it onto your offer's thank-you page if your network does not support S2S postbacks. It also has an Include additional parameters toggle for passing payout and transaction data.
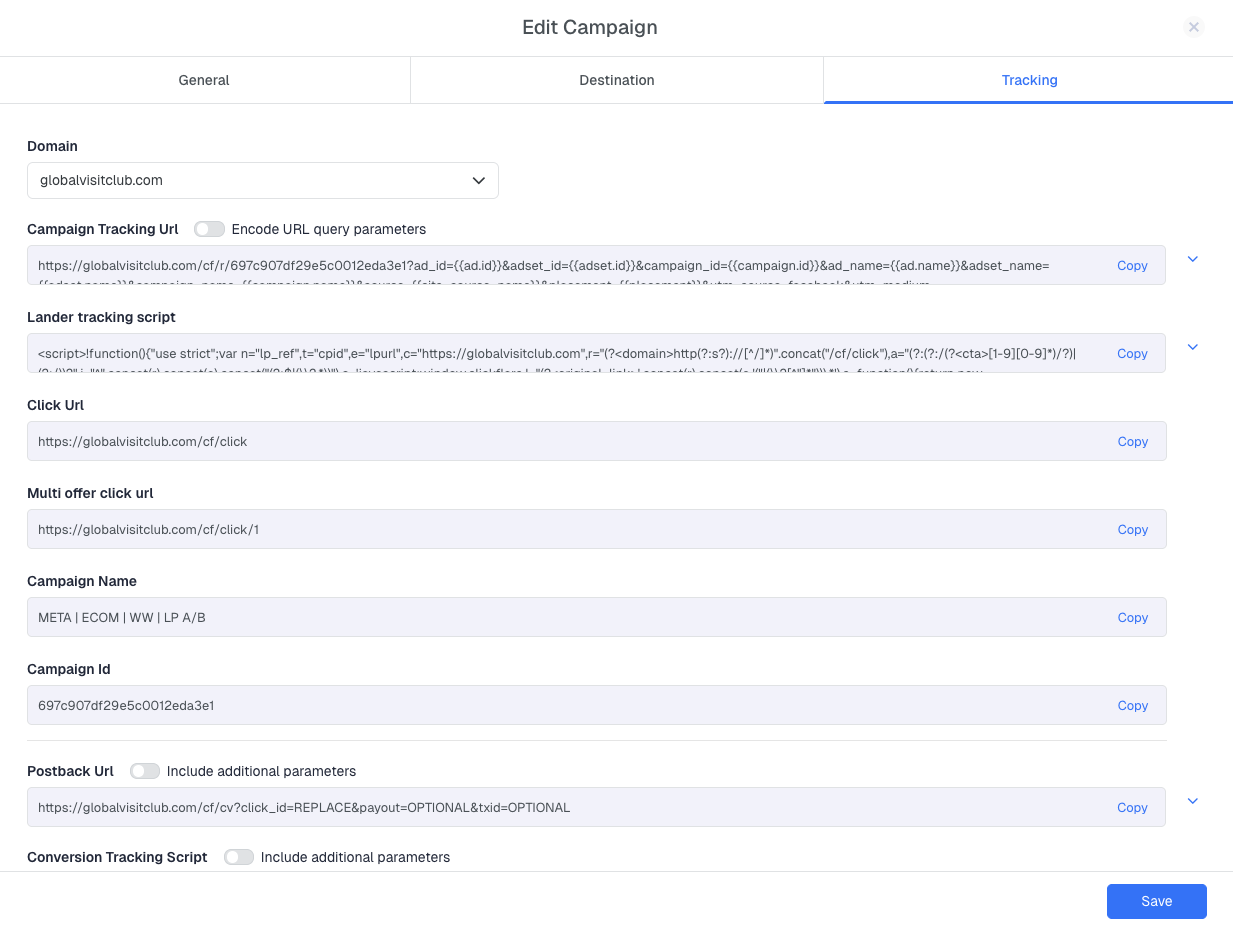
Click your Campaign URL in a browser and confirm a visit appears in ClickFlare. Then fire a test postback from your network and verify it appears in Logs. Five minutes of testing prevents hours of debugging after the fact.
Campaign Actions
From the Campaigns list, every campaign has four actions available from the icons on the right side of its row.
- Preview — opens the campaign URL in a new tab so you can walk through the full visitor journey without affecting your live stats.
- Edit — reopens the campaign form so you can change any setting. Changes take effect immediately for all new visits.
- Clone — creates an exact copy of the campaign with all settings preserved. Useful when launching a variant test or targeting a new geo with the same offer.
- Archive — removes the campaign from the active list without deleting it or its historical data. Archived campaigns are hidden by default and can be restored at any time using the Show Archived toggle in the filter panel.

FREQUENTLY ASKED QUESTIONS
Got questions? Find the answers below:
Q1: How many campaigns can I have?
A1: Each plan includes a limit on active (non-archived) campaigns. The Starter plan allows up to 500 active campaigns. If you reach the limit, archive campaigns you are no longer running to free up slots. Archived campaigns and their historical data are never deleted.
Q2: Can I use the same offer in multiple campaigns?
A2: Yes. An offer is a reusable asset in ClickFlare. You can assign the same offer to as many campaigns as you want. Each campaign generates its own Campaign URL and Click IDs, so attribution stays separate per campaign even when they share the same offer.
Q3: Can I change the tracking type after a campaign is live?
A3: Yes. You can edit a live campaign and switch between Redirect and Direct. Switching mid-campaign requires you to update the destination URL in your ad and, when switching to Direct, add ClickFlare's script to your landing page. Historical data is preserved and new visits will use the updated tracking method.
Q4: Why is my campaign showing visits but no conversions?
A4: The most common causes are: the Click ID token is not being appended correctly to the offer URL, the affiliate network postback is not configured with ClickFlare's Postback URL, or the network is firing to the wrong URL. Check Logs then Postback Status to see whether postbacks are arriving and whether they are being matched to a visit.
Q5: What is the difference between a Flow and a Path?
A5: A Flow is the container. A Path is a rule inside it. A Flow can have one default path and any number of conditional paths. When a visitor enters the campaign, ClickFlare evaluates the conditional paths in order and sends the visitor down the first one that matches. If none match, the default path handles the visit.